
Installation Guide


6.0 Maintenance
6.1 General Care
The SureSine should be mounted in a location out of direct sunlight with
plenty of airflow for proper cooling.
The exterior surfaces can be cleaned with a damp cloth as needed.
Do not apply power if the SureSine case is cracked or damaged.
6.2 Annual Inspection
1. Tighten all terminals to avoid resistive connections.
2. Check all system fuses.
3. Inspect for broken wires, frayed wire insulation, and corroded conductors.
4. Inspect for dirt, insects, nests. Clean if necessary.
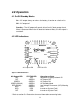
5. Check that the LED indicators match the system and inverter conditions at
that time (see section 4.0 – LED Indications for details).
6. Open and close the Remote ON/OFF contacts. Verify that the AC Output
properly switches on and off.
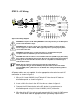
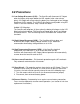
6.3 Fuse Replacement
If the SureSine does not function properly, there is a possibility of a blown fuse
caused by DC reverse polarity or over-current. To check the fuses:
1. Disconnect the Battery+ connection from the battery.
2. Disconnect all wire connections to the SureSine
3. Using a Philips screwdriver, remove the four screws that secure the plastic
lid and carefully remove the lid.
4. See diagram below for fuse location. Inspect each of the three (3) fuses.
Blown fuses will have a damaged filament.
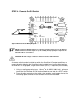
5. Replace fuses as needed. Replacement fuses should be 40A rated
quick-blow automotive type fuses only.
6. Replace lid and secure with the four screws.
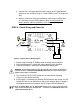
7. Reconnect wire connections per the installation instructions in Section 3.0
Figure 8 Fuse Location
CAUTION: Replace lid before
reconnecting power. DO NOT
OPERATE INVERTER WITHOUT
LID. Serious injury may result!
13