
Installation Guide


MNPV12 & 16 Combiner Instructions (continued)
4 |
P a g e 1 0 - 0 27- 1
R E V : B
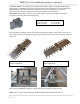
The installation of a PV combiner is fairly straight forward. Select the location to install your combiner first. Some
systems have the PV modules located close to the inverters and or battery system. If this is the case, you can elect
to mount the MNPV inside and run each PV string down to the MNPV inside the building. This is convenient for
trouble shooting and upgrading. For longer runs the combiner will be mounted outdoors on a pole for pole
mounted PV arrays or similar mounting for rack mounted arrays. The combiner can be mounted in the vertical
position or slanted backwards to accommodate up to a 3/12 roof pitch. All unused holes should be blocked using
RTV sealant or some similar goop in order to keep rain and bugs out of the enclosure. It is very common for critters
to enter through an unused mounting hole and take up roost. They will eventually degrade the performance of
your system to say nothing of the yuk factor upon discovery of their nest.
Be sure to comply with all local and national code requirements including National Electrical Code, ANSI/NFPA 70.
Observe Class 1 wiring requirements. Use 14- 1/0 AWM wire in accordance with the National Electric Code based
on fuse/circuit breaker protection. Combiners should be mounted with #10 or larger stainless steel hardware.
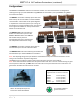
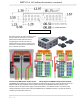
To remove the dead front:
Pry off the lid as shown using something like a
screwdriver as a lever.
The dead front will then come out easily.
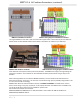
Above: Various Combiner installations