
Installation Guide
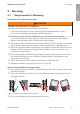
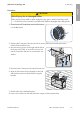
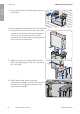
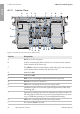
Table Of Contents
- Installation Manual
- Legal Provisions
- Table of Contents
- 1 Information on this Document
- 2 Safety
- 3 Scope of Delivery
- 4 Product Overview
- 5 Mounting
- 6 Electrical Connection
- 7 Commissioning
- 8 Disconnecting the Inverter from Voltage Sources
- 9 Decommissioning the Inverter
- 10 Technical Data
- 11 Compliance Information
- 12 Contact
- Instrucciones de instalación
- Disposiciones legales
- Índice
- 1 Indicaciones sobre este documento
- 2 Seguridad
- 3 Contenido de la entrega
- 4 Vista general del producto
- 5 Montaje
- 6 Conexión eléctrica
- 7 Puesta en marcha
- 8 Desconexión del inversor de la tensión
- 9 Puesta fuera de servicio del inversor
- 10 Datos técnicos
- 11 Información de cumplimiento
- 12 Contacto
- Instructions d’installation
- Dispositions légales
- Table des matières
- 1 Remarques relatives à ce document
- 2 Sécurité
- 3 Contenu de la livraison
- 4 Vue d’ensemble des produits
- 5 Montage
- 6 Raccordement électrique
- 7 Mise en service
- 8 Mise hors tension de l’onduleur
- 9 Mise hors service de l’onduleur
- 10 Caractéristiques techniques
- 11 Informations sur le respect des spécifications
- 12 Contact

6 Electrical Connection
SMA Solar Technology AG
Installation Manual SBxx-1SP-US-41-IA-xx-10 29
6 Electrical Connection
6.1 Overview of the Connection Area
6.1.1 View from Below
B
A
C
D
Figure 7 : Enclosure openings at the bottom of the inverter
Position Designation
A Enclosure opening for DC connection (for 21mm (0.75in) trade size
conduits)
B Enclosure opening for the connection cables of the Antenna Extension Kit
and, if needed, for other data cables (for 21mm (0.75in) trade size
conduits)
C Enclosure opening for the network cables and, if needed, for other data
cables (for 21mm (0.75in) trade size conduits)
D Enclosure opening for the AC connection and the connection cables of
the outlet and, if necessary, for the switch for the secure power supply op-
eration (for 21mm (0.75in) trade size conduits)
ENGLISH