
Installation Guide
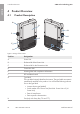
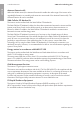
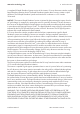
Table Of Contents
- Installation Manual
- Legal Provisions
- Table of Contents
- 1 Information on this Document
- 2 Safety
- 3 Scope of Delivery
- 4 Product Overview
- 5 Mounting
- 6 Electrical Connection
- 7 Commissioning
- 8 Disconnecting the Inverter from Voltage Sources
- 9 Decommissioning the Inverter
- 10 Technical Data
- 11 Compliance Information
- 12 Contact
- Instrucciones de instalación
- Disposiciones legales
- Índice
- 1 Indicaciones sobre este documento
- 2 Seguridad
- 3 Contenido de la entrega
- 4 Vista general del producto
- 5 Montaje
- 6 Conexión eléctrica
- 7 Puesta en marcha
- 8 Desconexión del inversor de la tensión
- 9 Puesta fuera de servicio del inversor
- 10 Datos técnicos
- 11 Información de cumplimiento
- 12 Contacto
- Instructions d’installation
- Dispositions légales
- Table des matières
- 1 Remarques relatives à ce document
- 2 Sécurité
- 3 Contenu de la livraison
- 4 Vue d’ensemble des produits
- 5 Montage
- 6 Raccordement électrique
- 7 Mise en service
- 8 Mise hors tension de l’onduleur
- 9 Mise hors service de l’onduleur
- 10 Caractéristiques techniques
- 11 Informations sur le respect des spécifications
- 12 Contact

4 Product Overview
SMA Solar Technology AG
Installation ManualSBxx-1SP-US-41-IA-xx-1014
4 Product Overview
4.1 Product Description
SUNNY BO
Y
G
K
I
H
J
SUNNY BO
Y
B
E
C
A
D
F
Figure 2 : Design of the inverter
Position Designation
A Power Unit
B Enclosure lid of the Power Unit
C Enclosure lid for the Connection Unit
D Connection Unit
E Warning label with compliance information
F DC load-break switch
G Type label
The type label uniquely identifies the inverter. The type label must remain
permanently attached to the product. You will find the following informa-
tion on the type label:
• Inverter device type (Model)
• Serial number of the PowerUnit (Serial No. Power Unit or S/N
Power Unit)
• Date of manufacture
• Device-specific characteristics
H Fan (only with Sunny Boy 7.0 and 7.7)
ENGLISH