
Installation Guide

17TriStar Meter 2 Operator’s Manual
Modify the MeterBus Address with the TriStar Meter 2
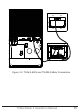
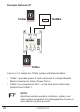
1. Connect a TriStar local or remote meter to the second
TriStar in the system.
2. Wait for the meter to power up and detect the connected
TriStar. Once the meter has fully started, scroll to the bot-
tom of the main menu to the Logged Data screen. Press
and hold the down push-button for three seconds until the
Advanced Set-Up menu appears. See the Advanced Set-Up
menu topic in section 4.2 for more details on how to access
this menu.
3. In the Advanced Set-Up menu, scroll down to the MeterBus
Address screen. Scroll left or right to increment/decrement
the MeterBus address to the desired value.
4. Whennished,pushtheuppush-buttontoexitthemenu.
The LEDs on the controller should display a fault sequence
indicatingthatmemoryhasbeenmodied.
5. Cycle power to the controller to reset the fault condition.
6. Disconnect the meter from the second controller. Repeat
steps 1 - 5 for each additional TriStar in the system, pro-
gramming each controller with addresses 3, 4, 5, etc. A
maximum of 15 TriStar controllers are possible on a single
MeterBus network.
NOTE:
The Morningstar Relay Driver has a default factory
MeterBus address of 9. If a RelayDriver is present in
the system, skip address 9 when programming the
TriStars and resume numbering at address 10.