
Installation Guide

14 Installation
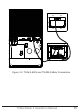
3.4 TS-M-2-600V Install (1 TriStar)
To install the local controller-mounted meter to a single TriStar
MPPT 600V:
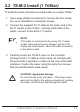
1. Use a large phillips screwdriver to remove the four wiring
box cover (standard or extended) screws.
2. Use a 7mm nut-driver to remove the existing blank meter
panel. Retain the (4) nuts.
3. Position the TS-M-2-600V mounting plate onto the screws
behind the meter window, and secure using the (4) nuts
retained in Step 2.
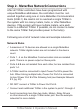
4. Connect the supplied RJ-11 cable to the RJ-11 socket
on the TriStar MPPT 600V, and to the meter socket labeled
“Tristar”.
5. If adding a TS-RM-2, route the supplied RJ-11 cable into
the wiring box through a knock-out. Connect the cable to the
TS-M-2-600V socket labeled “Meter”. Looking at the back of
the remote meter, connect the other end of the cable to the left
socket - see Figure 3.2 on page 15.
6. Arrange the RJ-11 cable so that it does not interfere with
the push-button operation or obscure the view of the LED
indicators.
7. Verify that the RJ-11 wires are properly contained within
the wiring box, and that the wiring has no pinch points. Then
replace the wiring box cover and secure with the (4) existing
cover screws.