
Installation Guide

11TriStar Meter 2 Operator’s Manual
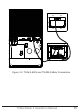
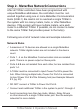
3.2 TS-M-2 Install (1 TriStar)
To install the local controller-mounted meter to a single TriStar:
1. Use a large phillips screwdriver to remove the four wiring
box cover (standard or extended) screws.
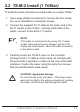
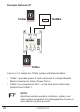
2. Connect the supplied RJ-11 cable to the meter and to the
RJ-11 socket on the TriStar. Looking at the back of the
meter, connect to the left RJ-11 socket.
NOTE:
If the cable is connected to the wrong RJ-11 meter
socket, there will not be any damage and the LCD
display will remain blank. Move the cable connection
to the other socket.
3. Carefully mount the TS-M-2 cover on the controller.
Arrange the RJ-11 cable so that it does not interfere with
the push-button operation or obscure the view of the LED
indicators. Fasten the meter using the same four screws
that secured the blank meter panel.
!
CAUTION: Equipment Damage
Do not force the cover into place. If the large power
wires are too high in the wiring compartment, pushing
the meter onto the wires will damage the meter.