Prizm™ II • III • IV * V Prizm ™ manufactured by ® White’s Electronics, Inc. 1011 Pleasant Valley Road Sweet Home, OR 97386 USA Visit our site on the World Wide Web www.whiteselectronics.com for the latest information on products, services, Local Dealers and treasure hunting news.
Prizm™ II • III • IV • V ⇠
Prizm™ II • III • IV * V Guide to this Manual Assembly........................................................................................................ 4 Batteries.......................................................................................................... 6 Getting Started - Prizm II, III, IV............................................................... 8 Prizm™ II Controls...........................................................................
Prizm™ II • III • IV • V To Assemble 1. Remove all parts from shipping carton (see diagram next page). 2. Use nonmetallic washers (between round search coil and clevis fiber rod), and fiber bolt and thumbnut to secure search coil to fiber rod. 3. Unlock Camlock on “S” rod, insert fiber rod into curved rod, line up buttons into one of adjustment holes. Twist Camlock to LOCK. 4. Unravel search coil cable and wind around rods (first revolution over top of rod).
Prizm™ II • III • IV * V Assembly Diagram Search Coil Fiber Bolt Search Coil Cable Display Thumbnut Control Buttons Non-metallic Washers Fiber Rod Camlock Handle Search Coil Cable to Control Box Connector “S” Rod Elbow Cup Large Nylon Strap ⇠
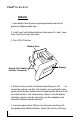
Prizm™ II • III • IV • V Batteries 1. Open battery door by pressing elongated button on back of display and flipping open door. 2. Install two 9-volt alkaline batteries taking note of (+) and (-) positions (only fit one way), close door. 3. Press ON/OFF button. Battery Door ry te at B ry te at B Search Coil Cable to Control Box Connector Display 4. Batteries that are weak, or become weak during use, will automatically indicate Low Batt.
Prizm™ II • III • IV * V mittent use, temperature, control settings, target indications, battery quality, battery condition upon purchase, and shelf life. One may add or subtract as much as 50% depending upon the above variables. It is always wise to carry back up batteries when traveling far from home. 6. Good quality rechargeable transistor 9-volt batteries may be purchased separately for use in your Prizm.
Prizm™ II • III • IV • V Getting Started (Prizm™ II, III, IV, V) 1. Once assembled with good batteries installed, press ON/ OFF. 2. Due to the many metals used in modern construction it is best to use and practice outdoors. 3. Sweep the round search coil from side to side over ground evenly (near to or touching ground surface) keeping it very close to the ground throughout each pass and overlapping each pass as if mopping a floor.
Prizm™ II • III • IV * V likely uninteresting metal targets. Ignore these targets. 6. Once a solid repeatable beep and display indication are located, press P/P button and “X” area to pinpoint exactly where to dig. Press P/P again to continue searching. 7. Sweeping the round search coil over the ground, recognizing solid repeatable beeps and display indications from broken or inconsistent ones, pinpointing, and digging all take practice. Be patient.
Prizm™ II • III • IV • V Prizm™ II Controls 1. ON/OFF turns the Power ON and OFF. Batteries that are weak, or become weak during use, will automatically indicate Low Batt. with a battery icon on the left center portion of the display. Replace with two good quality alkaline 9-volt transistor batteries. Remove batteries for storage beyond two weeks. 2. SENS (sensitivity) adjusts the responsiveness to metals, ground, and external electrical interference.
Prizm™ II • III • IV * V 4. DISC (discrimination) selects the acceptance or rejection (regarding audio beep) of each category on the display from iron to z1 (zinc cent). The current settings are indicated continuously on the display as a speaker in a circle with a slash through it directly under each category selected as a rejection. For more jewelry, except for iron, accept as many categories as you can endure digging.
Prizm™ II • III • IV • V Prizm™ III Controls In addition to the features of the Prizm™ II, the Prizm™ III has an additional feature 1. The depth of coin-sized metals is automatically indicated on the lower left-hand portion of the display. 2. Metals larger or smaller than typical coin size will skew this indication slightly. For example, a pop can will indicate very shallow, however, may in fact be found quite deep in the ground.
Prizm™ II • III • IV * V depth reading, to hedge the odds against trash and for valued metal items. 5. The depth indicates from 8 inches at the right towards 0 inches to the left.
Prizm™ II • III • IV • V Prizm™ IV In addition to the features of the Prizm™ II and Prizm™ III the Prizm™ IV has additional features 1. Tone I.D. (Tone Identification) is engaged when the Tone I.D. note is displayed. Press TONE I.D. to disable/enable. At minimum DISC, three different tones now indicate the display categories, “large” Iron “Low Tone”, Foil & TAB “Medium Tone”, ALL coins “High Tone”. This Tone I.D.
Prizm™ II • III • IV * V Prizm™ IV & V 2. Smart Notch. Press Smart Notch. With DISC control set at FOIL or below, pull tabs are eliminated. With DISC control at Nickels or above, Nickels are accepted. Smart Notch either eliminates TAB or accepts Nickels. A missing or added DISC symbol indicates Smart Notch is engaged. The DISC categories are linear in that as DISC is increased first IRON is rejected, then FOIL, then 5 Cent, etc. from left to right based on these metals electrical properties.
Prizm™ II • III • IV • V Prizm™ V In addition to the features of the Prizm™ II, Prizm™ III, and Prizm IV, the Prizm™ V has additional features 1. Multi Tone (Tone Identification) is engaged when the musical note is displayed. Tap Multi Tone to disable / enable. At minimum DISC, eight different tones now indicate the display categories, from iron, at the lowest tone, to 50 cents at the highest tone.
Prizm™ II • III • IV * V Prizm™ V 2. Press and hold Multi Tone a few seconds (instead of tapping) to enable three tone Tone ID (like Prizm IV). An operator may wish to limit the tone range to three tones, good targets at the higher tone, questionable foil range targets at the medium tone, and iron at the lowest tone. 3. VCO (Voltage Controlled Oscillator) Pinpointing. VCO produces a progressively higher pitched tone as the target signal becomes progressively stronger during pinpointing.
Prizm™ II • III • IV • V Smart Notch Display The Prizm™ Display, and information above the Display, provide a wealth of information about the metal target.
Prizm™ II • III • IV * V Displays 1. Eight distinct target categories are listed across the top of the display and indicate the most common metals found within these categories. It is important to understand the display information should only be consulted after a solid repeatable audio tone “beep” has been located. 2. A specific metals category is dictated by that metals exact content, size, and shape. The reference label above the display provides a comparison of known metals.
Prizm™ II • III • IV • V tion upon purchase, and shelf life. One may add or subtract as much as 50% depending upon the above variables. It is always wise to carry back up batteries when traveling far from home. 4. Control status is also shown on the display. P/P All Metal on is indicated in the center of the display. Sensitivity setting on the lower right. Discrimination settings on the upper portion under each display category. Prizm™ III and IV shows depth indication on the lower left.
Prizm™ II • III • IV * V Accessories Accessories available for your Prizm™ will enhance convenience and your searching experience. 1. Digging Tool You can use a garden trowel, however, detector-specific digging tools and aprons for storing finds, developed over the last 60 years, are more durable, effective, easier on the environment, and on your person. Sand scoops are recommended for sand as digging is difficult in these conditions. 2.
Prizm™ II • III • IV • V 4. Carry Case Damage during storage and travel may well exceed damage during searching. Convenient storage/ carry bags allow all the related equipment to be kept together for use at a moments notice and protect the detector from incidental damage. 5. Books and Videos A photo is worth a thousand words. Books and videos can speed the learning curve immensely. Draw from the years of experience of those who have went before you. 6.
Prizm™ II • III • IV * V Repair Service White’s reputation has been built on quality products backed by quality service. Our factory Authorized Service Centers are factory trained and equipped. They offer the same quality service as the factory. Service before and after the sale is the cornerstone of our customer relations. Before shipping detectors for service A. Contact your Dealer. There may be a quick, simple fix or explanation that will prevent having to send the detector in for service. B.
Prizm™ II • III • IV • V Authorized Service Centers In the unlikely event your detector requires service please note our following Authorized Service Centers; 1. White's Electronics 1011 Pleasant Valley Rd. Sweet Home, OR 97386 (541) 367-6121 FAX (541) 367-6629 nbaker@whiteselectronics.com WA 1 OR NV CA MT ID UT AZ AK HI 2. Electronic Exploration 575 West Harrison Lombard, IL 60148 (630) 620-0618 FAX (630) 620-1005 Toll-Free 800-392-3223* tony@ee-il.
Prizm™ II • III • IV * V UK, Europe, Northern Asia, Africa, Near East, Mid East White’s UK Ltd. 35J Harbour Road Inverness, Scotland IV1 1UA Telephone: (011)441-463-223-456 Fax: 441-463-224-048 E-Mail: sales@whelects.demon.co.uk Web Site: www.whites.co.uk Australia, New Zealand, Far East, Southern Pacific Rim Finders PTY. LTD 90 Broadway Dunolly, Victoria 3472 Telephone: (61) 03-5468-1333 Fax: (61) 03-5468-1130 E-mail: finders@finders.com.au Web Site: www.finders.com.
Prizm™ II • III • IV • V Warranty If within two years (24 months) from the original date of purchase, your White’s detector fails due to defects in either material or workmanship, White’s will repair or replace at its option, all necessary parts without charge for parts or labor. Simply return the complete detector to the Dealer where you purchased it, or to your nearest Authorized Service Center. The unit must be accompanied by a detailed explanation of the symptoms of the failure.
Prizm™ II • III • IV * V use, neglect, alterations, modifications, unauthorized service, or prolonged exposure to corrosive compounds, including salt. Duration of any implied warranty (e.g., merchantability and fitness for a particular purpose) shall not be longer than the stated warranty. Neither the manufacturer or the retailer shall be liable for any incidental or consequential damages.
Prizm™ II • III • IV • V Warranty Transfer If for any reason you should sell your Prizm™ prior to the date the warranty expires, the remaining warranty is transferable. This transfer is authorized by calling 1-800-547-6911, and getting an Authorization Number. Simply fill out the following information, including the Authorization Number, seal it in a stamped envelope, and send it to White’s Electronics, 1011 Pleasant Valley Road, Sweet Home, Oregon 97386.
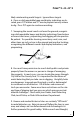
Prizm™ II • III • IV * V Target Re⇢cov⇢ery The following “Hinged Door Method” of digging is widely recommended to minimize damage to lawns. Careful recovery in multiple-use well-groomed areas is the responsibility of all metal-detector users. #1. After locating a good #2. Using a sturdy dig- #3. Cut through the turf, being careful to cut around the target and not damage it. target (metal), pinpoint the center. If your instrument has depth reading, take note of the depth.
Prizm™ II • III • IV • V NOTES ...
Prizm™ II • III • IV * V NOTES ...
Prizm™ II • III • IV • V NOTES ...