MINI PLATINUM SPLIT VERSION 3 OWNER’S MANUAL NOTICE: To activate the split system warranty, the installing certified HVAC/R service tech must complete the split system warranty checklist and send back to CellarCool.
Conforms to ANSI/UL Std 427 Certified to CAN/CSA Std C22.2 No. 120 We manufacture, test and certify 100% of our wine cooling units in the USA. By sourcing the best components and closely controlling our manufacturing processes, we can assure the highest-quality, lowest defect manufacturing rates in the industry. Copyright © 2012. WhisperKOOL. All rights reserved. WhisperKOOL copyrights this manual, the product design, and the design concepts, with all rights reserved.
Mini Split TABLE OF CONTENTS Introduction . . . . . . . . . . . . . . . . . . . . . . . . . . . . . . . . . . . . . . . . . . . . . . . . . . . . . . . . . . . . . . . . . 2 Before You Start. . . . . . . . . . . . . . . . . . . . . . . . . . . . . . . . . . . . . . . . . . . . . . . . . . . . . . . . . . . . . . 3 Receiving & Inspecting the System . . . . . . . . . . . .
INTRODUCTION Customer Service Thank you for purchasing a WhisperKOOL cooling system. We strive to provide the highest-quality products and the best possible customer service. If you have any questions about your system, please call us at 1-800-343-9463 or visit WhisperKOOL.com. Using the Manual This manual is intended to assist in the proper maintenance of the cooling system. In order to ensure the longevity of your cooling unit, the equipment should be installed as outlined in the technician’s manual.
Mini Split BEFORE YOU START 1-800-343-9463 1. Inspect all components prior to installation. If damage is found, please contact your distributor or WhisperKOOL Customer Service at 1-800-343-9463. 2. The evaporator unit and condensing unit each require a dedicated 115V, 20-amp circuit. Use a surge protector with the unit. Do not use a GFI (ground fault interrupter) line. 3. The evaporator unit and condensing unit require no communication lines unless the system is equipped with a Cold Weather Start Kit.
RECEIVING & INSPECTING THE SYSTEM Upon receiving your WhisperKOOL unit: • • Use caution when lifting and check package for damage. Lift only at the designated hand-hold locations on the shipping container, or fully support the unit from underneath. A shipment may include one or more boxes containing accessories. Before opening the container, inspect the packaging for any obvious signs of damage or mishandling. Write any discrepancy or visual damage on the bill of lading before signing.
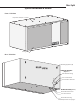
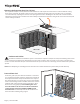
QUICK REFERENCE GUIDE Mini Split Front / Side View Evaporator unit (fan coil unit) Filter grille Rear / Side View Mounting keyholes (4) REAR V IEW THROUGH THE WALL (Option 1) Knockout for wiring Line set knockout Knockout for drain line INSIDE CELLAR (Option 2) Knockout for drain line Line set knockout Knockout for wiring www.whisperkool.
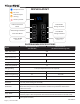
DISPLAY LAYOUT Compressor is on Fan is on Anti-Frost Cycle running 55 Alarm is present °F Scroll Button Return to Previous Menu Change Set Point View/Change Set Point Scroll Button Enter User Menu Change Set Point Power On/Off Unlock Button (hold for 5 sec) (hold for 1 sec) PLATINUM MINI SPECIFICATIONS Model Mini Evaporator Unit (Fan Coil Unit) Cellar Size (cu. ft.) Dimensions Mini Condenser (Air-Cooled Condensing Unit) 500 20”w x 10.
Mini Split PREPARING THE WINE CELLAR The performance and life of your system is contingent upon the steps you take in preparing the wine cellar. Improperly preparing your enclosure or incorrectly installing your unit may cause unit failure, leaking of condensation, and other negative side effects. It is highly recommended that you obtain the assistance of a wine storage professional.
Mounting the Evaporator Unit (Fan Coil Unit) The evaporator unit (fan coil unit) must be mounted within 18“ of the top of the room in order to achieve sufficient cooling. As the room cools down, the warm air will rise to the ceiling. Mounting the unit high in the room will create a consistently cool environment by capturing the warm air and replacing it with cool air.
Mini Split Ventilation The necessity of dissipating heat away from the condensing unit is critical to the unit’s performance and cannot be overstated. As the system operates and cools, a greater amount of heat is generated on the condensing side of the system. Adequate ventilation is required in order to dissipate heat away from the condensing unit. If ventilation is inadequate, the exhaust will heat up the area or room and adversely affect the system’s ability to cool.
LIQUID-MEASURING THERMOSTAT SYSTEM (BOTTLE PROBE) WhisperKOOL cooling units come with a liquid-temperature-measuring thermostat. The self-calibrating probe contains a sensor chip, which communicates back and forth with the thermostat. This results in a consistent temperature setting and accuracy. Wine should be kept at a very precise, controlled temperature and humidity. By measuring the liquid temperature rather than air, the unit will operate 75–80% of the time. Setting up the Bottle Probe: 1. 2. 3. 4.
Mini Split SYSTEM OPERATION Initial Start-Up When the unit is plugged in and power is sent to the controller, a beep will sound, confirming that the controller is getting power. All LEDs on the display will blink three times. Three dashes will then appear on the screen. All display LEDs will then blink three times. Once the controller has gone through the initial startup process, and all LEDs have cycled, the home screen will be displayed. Set Point The set point is preset at the factory to 55°F.
°F DISPLAY LAYOUT Alarm is present Compressor is on Fan is on Anti-Frost Cycle running 55 °F Scroll Button Return to Previous Menu Change Set Point View/Change Set Point Scroll Button Enter User Menu (hold for 3 sec) Change Set Point Unlock Button Power On/Off Page 12 | 1-800-343-9463 (hold for 1 sec) MSP 090517
Mini Split Button CONTROLLER FUNCTIONS 55 Normal Functions °F INITIAL STARTUP When the unit is plugged in and power is sent to the controller, a beep will sound, confirming that the controller is getting power. All LEDs on the display will blink three times. Three dashes will then appear on the screen. All display LEDs will then blink three times. Once the controller has gone through the initial startup process, and all LEDs have cycled, the home screen will be displayed.
Icon SNOWFLAKE ICON GLOSSARY NOTES Meaning Blinking: The unit is calling for cooling, but must wait five minutes before restarting the compressor. This five-minute delay serves as an Anti-Short Cycle for the compressor’s protection. Constant: The unit is in cooling mode and the condensing unit is running. DRIPPING SNOWFLAKE The unit is undergoing an Anti-Frost Cycle. See System Operation page for further details. FAN The evaporator fan is running.
Mini Split ALARM CODES Code Cause Solution The following alarm codes will be displayed on the screen along with the alarm icon. Bottle probe is not connected Attach bottle probe to circular connector (see instructions on page 10 of the technician’s manual) Faulty bottle probe connection Locate faulty bottle probe connection by inspecting all wiring connections between the bottle probe and the circuit board.
USER MENU The User Menu is accessed by pressing and holding the SET button for 3 seconds. Use the UP and DOWN ARROW buttons to navigate to desired parameters. Press the SET button again to view these parameters. Press the UP and DOWN ARROW buttons to adjust a parameter.
Mini Split NOTES www.whisperkool.
TROUBLESHOOTING GUIDE Unit has ice forming on the evaporator unit (fan coil unit) Possible cause Solution Evaporator filter or coil is dirty Remove the filter and wash it, then clean the coil with a vacuum. If coil is very dirty, use a spray bottle with a small amount of liquid dish detergent or coil cleaner. Spray coil, let set for five minutes, then flush with fresh water.
Mini Split Unit leaks water Possible cause Solution Evaporator unit (fan coil unit) is not level Evaporator unit (fan coil unit) should be level on the wall to prevent leaking Drain line clogged or kinked Check drain line to make sure water can flow freely Drain is clogged, preventing water from escaping Disconnect drain and clear it out; open access door and check drain for blockage Drain line does not have a downward slope Fix drain line so there is a downward slope from the unit to the drain Co
MAINTENANCE SCHEDULE Monthly 1. Check for debris surrounding condensing unit (leaves, branches, trash, etc); remove all obstructions 2. Check for unusual noise or vibration 3. Check the drain line to see if it is above the waterline (if draining into a vessel) Quarterly 1. Use a vacuum with brush attachment to clean the evaporator coil; be careful not to crush coil fins when cleaning 2. Remove the evaporator filter and clean with warm water 3. Ensure the condensing unit is free of debris and dust 4.
Mini Split TECHNICAL ASSISTANCE WhisperKOOL Customer Service is available Monday through Friday from 6:00 a.m. to 4:00 p.m. Pacific Standard Time. The appointed customer service representative will be able to assist you with your questions and warranty information more effectively if you provide them with the following: • • • The model and serial number of your WhisperKOOL systems. Location of unit and installation details, such as ventilation, ducting, construction of your wine cellar, and room size.
The Coolest Thing In Wine Storage Split System Series Product Warranty Information WhisperKOOL Product Terms and Conditions Including Product Limited Warranty And Product Installation Requirements For WhisperKOOL Split System Series ATTENTION: PLEASE READ THESE TERMS OF USE CAREFULLY BEFORE INSTALLING YOUR WHISPERKOOL COOLING SYSTEM. INSTALLING YOUR WHISPERKOOL COOLING SYSTEM INDICATES THAT YOU ACCEPT AND AGREE TO EACH OF THE TERMS AND CONDITIONS SET FORTH HEREIN (“TERMS OF USE”).
The following part or cause of failure is not the responsibility of WhisperKOOL: • Improper voltage supply • Line set with screw connectors (high end and low end) • Leaks found at the braze points when performing pressure check • Unit that has been charged incorrectly • Incorrect tubing diameter used on line set • A unit that has been wired incorrectly • Valve stem on condenser side • Improper installation of P-Trap • Lack of P-Trap (if required) • Condensers that are installed outdoors or in elements that
1. AND FITNESS FOR A PARTICULAR PURPOSE ARE HEREBY EXPRESSLY DISCLAIMED. Some states do not allow the exclusion or limitation of incidental or consequential damages, or allow limitations on how long an implied warranty lasts, so the above limitations or exclusions may not apply to you. This limited warranty gives you specific legal rights, and you may have other rights, which vary from state to state. 2.
5. Sales and Use Tax WhisperKOOL only collects California sales tax for orders shipped within the State of California; WhisperKOOL does not collect sales tax for orders shipped to other states. However, the Purchaser and the End User may be liable to the taxing authority in their state for sales tax and/or use tax on the Product. The Purchaser and the End User should each check with their state’s taxing authority for sales and use tax regulations. 6.
9. Questions, Additional Information And Technical Assistance A. Questions. If you have any questions regarding these Terms and Conditions or wish to obtain additional information, contact us via phone at 1-800-343-9463 or please send a letter via U.S. Mail to: Customer Service WhisperKOOL Corporation 1738 E Alpine Ave Stockton, CA 95205 Email: support@whisperkool.com Web: www.whisperkool.com B. Technical Assistance. WhisperKOOL Customer Service is available Monday through Friday from 6:00 a.m. to 4:00 p.m.
WhisperKOOL 1738 E. Alpine Ave Stockton, CA 95205 1(800) 343-9463 www.whisperkool.