
PVC Liner for Litter-Robot 3 Open Air Globe Assembly - User Manual

Remove the Old Liner
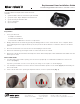
9. Note the placement of the foam strips on the back-left side of the Globe. You will have to place new ones in
a similar fashion. Remove and discard.
10. From the lip of the opening, peel back the Globe Liner, then unhook the Liner from the slots on the left and
right sides of the entryway (Fig. 4).
11. Slide the rubber T-mount (Fig. 5) out of the T-Slot. Disregard this instruction if your Liner does not have this.
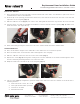
12. Turn the Globe over and use a Phillips screwdriver to remove the bolt near the opening (Fig. 6) and the nut
inside the Globe. Turn right side up.
13. Finish removal by peeling the Globe Liner out of the channel inside the Globe and discard it.
Install the New Liner
14. First, check that the weight on the underside of the Globe Liner is secured in its pocket.
15. Place the Globe Liner centered in the Globe and aligned to the entryway.
16. Slide the T-Mount of the Liner into the T-Slot of the Globe (Fig. 7).
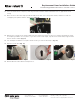
17. Replace the screw (Fig. 6) through the existing hole from the underside of the Globe and through the slit in
the Liner. Finish by fastening with the nut on the Liner side.
18. Wrap the Globe Liner around the lip of the entryway (Fig. 8).
19. Using a ‘clock’ (Fig. 9) configuration, push the ridge in the Globe Liner into the channel on the Globe in the
following manner:
y Start at the back center, 12 o’clock
y Then right and left sides (9 and 3)
y Continue to 10 and 2
y Finish with 4 and 8
Fig. 9
Fig. 6
Fig. 4
Fig. 5
Fig. 7 Fig. 8
Headquarters
2900 Auburn Ct.
Auburn Hills, MI 48326
Assembly
561 S Fairfield Ave
Juneau, WI 53039
Contact Customer Service
Monday - Friday, 9am - 7pm EST
1-877-250-7729 or support@litter-robot.com
Replacement Liner Installation Guide
Visit www.support.litter-robot.com for installation videos.