
Users Manual
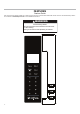

12
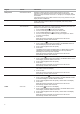
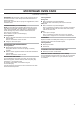
5. Release the 4 locating pins from locating holes, take out the
trim kit frame, and set aside.
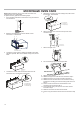
6. Remove the light cover screw from the top front of the
microwave oven.
7. Remove the light cover.
8. Pull out the halogen light from the light holder.
9. Replace a new halogen.
10. Reattach the light cover with the screw removed in step 7.
11. Reattach the light cover screw removed in step step 6.
12. Reattach the trim kit frame back to the microwave oven by
inserting the 4 locating pins into the locating holes remove in
step 5.
13. Fix the 4 screws to fast the trim kit frame back to the
microwave oven removed in step 4.
14. Fix the leftside cooling duct by screw the 3 short screws
removed in step 3.
15. Slide the microwave oven back to the cabinet.
16. Fix the 4 long wood screws to the trim kit removed from step
1.
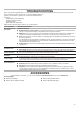
MICROWAVE OVEN CARE
Cavity Light is located at the top front of the microwave oven,
under the cover and is replaceable.
To replace the cavity light refer the following steps.
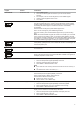
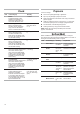
1. Using a Philips screwdriver to remove the 4 long wood screws
from the trim kit.
2. Slide the microwave oven out of the cabinet. Put the
microwave on a stable desk.
3. Loosen the 3 short screws to release the leftside cooling duct,
see below pictorial. Take out the leftside cooling duct, and set
aside.
4. Loosen the 4 screws which fast the trim kit frame to the
microwave oven, and set the 4 screws aside.
Screw
Light cover
Top front of the
microwave oven
$
%
$&DELQHW
%0LFURZDYH2YHQ
$
%
&
$7ULP.LW)UDPH
%6KRUW6FUHZV)
&6FUHZKROHV
$7ULP.LW)UDPH
%/RFDWLQJSLQ
&/RFDWLQJKROH
$
%
&
%
$
$/HIWVLGHCooling Duct
%6KRUW6FUHZV)
&6FUHZKROHV
&