
User Manual

WHEATHEART - X13 SERIES AUGERS 3. ASSEMBLY
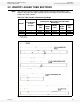
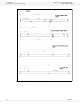
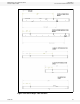
X1374, X1384, X1394 3.1. GENERAL ASSEMBLY
30787 R1 23
3. Assembly
Familiarize yourself with all the sub-assemblies and hardware making up the
auger. Do not take chances with safety. The components are large, heavy, and
can be hard to handle. Be sure to use the proper tools, stands, jacks, and hoists
for the job.
Important: These instructions are written on the assumption that 2 or more people will be
available for the assembly procedure. Because of the weight, it is unwise to
attempt assembly of the auger alone.
Note: When tightening all fasteners, see the Appendix for proper torque specifications.
3.1. GENERAL ASSEMBLY
1. Select an assembly area that is level, has a firm or hard surface and is free of
debris. Be sure it is large enough to allow access from all sides when the
components are being assembled.
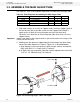
2. If assembling inside a building, be sure the ceiling is at least 14’ (4.27 m) high
to provide clearance when installing the undercarriage
3. Bring all the tools, blocks, stands, jacks, and hoists to the assembly area
before starting.
4. The following tools and equipment are required to assemble the machine:
• 11-14 support stands (tube section supports, three per tube)
• Four saw horses (1200 lb / 544.3 kg bearing capacity)
• One Standard socket set and wrench set
• One torque wrench
• One standard 25’ (7.62 m) tape measure
• One 2’ level
• One 8” level magnetic
• Two C-clamps or vise grips
• One picker with minimum reach of 12’ (3.66 m) 4000-6000 lb
(1 814 - 2 722 kg) lifting capacity
• One 100’ (30 m) measuring tape
• One tire gauge
• One tire chuck
• 6-10 wood blocks (2x4's or smaller)
• Grease
• Impact wrench and sockets
• Two or more steel punches (for aligning bolt holes)
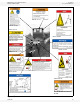
WARNING Before continuing, ensure you have read and understand the relevant information
in the safety section. Safety information is provided to help prevent serious injury, death, or
property damage.