
Manual
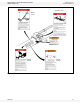


3. ASSEMBLY WHEATHEART - GHR & WHR GRAIN AUGERS
3.3. INTAKE HITCH GRAIN AUGERS SD
20 30662 R1
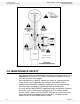
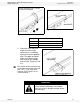
3.3. INTAKE HITCH
1. Clean dirt and paint
from lower flight stub
and intake bushing.
2. Attach intake hitch to
lower auger tube and
tighten securely.
3. Maintain 1/2” (1.27
cm) clearance
between bushing and
end of flight.
4. Attach clevis to intake
hitch with clevis pin
and gripclip.
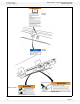
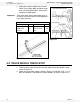
3.4. MULTI-STAGE DRIVESHAFT
Because some sections of the driveshaft are factory installed, please consult the
table below for correct sequence before completing installation. Then proceed as
follows:
1. Clean paint and dirt from driveshaft end and shaft connectors.
2. Slide shaft connector halfway onto the last pre-installed driveshaft segment.
3. Slip lower driveshaft segments through bearings on lower tube section.
Install a Woodruff key, and slide into shaft connector.
4. Place a few drops of oil at each driveshaft bearing to allow for break-in.
5. Tighten all set screws on shaft connectors.
Part Size Amt
Intake Hitch 7/16” x 1-1/4” bolt and locknut 8
Clevis Pin 3/4” 1
Figure 3.6
Table 3.1 Multi-Stage Driveshaft Sequence
AUGER
SIZE/LENGTH
SHAFT
SIZE
DRIVESHAFT SEQUENCE FROM DISCHARGE END
FIRST SECOND THIRD FOURTH
51’ 1-1/2” 20' (6.10 m) 20' (6.10 m) 6 '3-1/4” (1.91 m) -
61’ 1-1/2” 20' (6.10 m) 20' (6.10 m) 16' 3-1/4” (4.88 m) -
71’ 1-1/2” 20' (6.10 m) 20' (6.10 m) 20' (6.10 m) 6' 3-1/4” (1.91 m)