GHR130 & WHR130 GRAIN AUGERS PTO-SD & EMD DRIVE MODELS ASSEMBLY & OPERATOR MANUAL Grain Augers included in this manual: GHR130-41 WHR130-41 Read this manual before using product. Failure to follow instructions and safety precautions can result in serious injury, death, or property damage. Keep manual for future reference.
This product has been designed and constructed according to general engineering standardsa. Other local regulations may apply and must be followed by the operator. We strongly recommend that all personnel associated with this equipment be trained in the correct operational and safety procedures required for this product. Periodic reviews of this manual with all employees should be standard practice. For your convenience, we include this sign-off sheet so you can record your periodic reviews.
WHEATHEART - GHR & WHR GRAIN AUGERS GRAIN AUGERS TABLE OF CONTENTS 1. Introduction .......................................................................................................................... 5 2. Safety First............................................................................................................................ 7 2.1. General Safety ......................................................................................................... 8 2.2. Assembly Safety.............
WHEATHEART - GHR & WHR GRAIN AUGERS GRAIN AUGERS TABLE OF CONTENTS 7. Troubleshooting ................................................................................................................. 43 Limited Warranty .....................................................................................................................
WHEATHEART - GHR & WHR GRAIN AUGERS GRAIN AUGERS 1. INTRODUCTION 1. Introduction Thank you for purchasing a WHEATHEART grain auger. Before using, please read this manual and understand the various features of the equipment and precautions for efficient and safe operation. Keep this manual handy for frequent reference and to review with new personnel. A sign-off form is supplied on the inside front cover to record your safety reviews.
1.
WHEATHEART - GHR & WHR GRAIN AUGERS GRAIN AUGERS 2. SAFETY FIRST 2. Safety First The Safety Alert symbol to the left identifies important safety messages on the product and in the manual. When you see this symbol, be alert to the possibility of personal injury or death. Follow the instructions in the safety messages. Signal Words Note the use of the signal words DANGER, WARNING, CAUTION, and NOTICE with the safety messages.
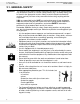
2. SAFETY FIRST 2.1. GENERAL SAFETY WHEATHEART - GHR & WHR GRAIN AUGERS GRAIN AUGERS 2.1. GENERAL SAFETY Important: This general safety section includes instructions that apply to all safety practices. Any instructions specific to a certain safety practice (e.g., assembly safety), can be found in the appropriate section. Always read the complete instructional sections and not just these safety summaries before doing anything with the equipment.
WHEATHEART - GHR & WHR GRAIN AUGERS GRAIN AUGERS 2. SAFETY FIRST 2.2. ASSEMBLY SAFETY • Follow good shop practices: • keep service area clean and dry • be sure electrical outlets and tools are properly grounded • use adequate light for the job at hand • Think SAFETY! Work SAFELY! 2.2. ASSEMBLY SAFETY • Read through the instructions to get to know the sub-assemblies and hardware that make up the equipment. • Do not take chances with safety. The components are large, heavy, and can be hard to handle.
2. SAFETY FIRST 2.4. PTO SAFETY WHEATHEART - GHR & WHR GRAIN AUGERS GRAIN AUGERS Figure 2.1 2.4. PTO SAFETY • Never use a PTO driveline without a rotating shield in good working order. • Ensure PTO driveline is securely attached at both ends before operating. • Before starting tractor, turn power to PTO to the off position (where applicable). • Keep body, hair, and clothing away from rotating PTO driveline. • Ensure the PTO driveline shields turn freely on the PTO driveline.
WHEATHEART - GHR & WHR GRAIN AUGERS GRAIN AUGERS 2. SAFETY FIRST 2.5. ELECTRIC MOTOR SAFETY 2.5. ELECTRIC MOTOR SAFETY • Inspect the drive belts before using auger. Replace if frayed or damaged. • Do not grab or touch drive belts during operation for any reason. • Remember to ground electric motor before using auger. 2.6. TRANSPORT & PLACEMENT SAFETY • Transport auger in full down position with slight tension on cable. • Properly place hitch pin and securely attach safety chain.
2. SAFETY FIRST 2.7. MAINTENANCE SAFETY WHEATHEART - GHR & WHR GRAIN AUGERS GRAIN AUGERS 2.7. MAINTENANCE SAFETY • Shut down and lock out all power before attempting maintenance of any kind. If applicable, disconnect PTO driveline from tractor or hydraulic hoses on units with hydraulic drive hoppers. • After maintenance is complete, replace and secure all safety guards and safety devices, and if applicable, service doors and cleanout covers.
WHEATHEART - GHR & WHR GRAIN AUGERS GRAIN AUGERS 2. SAFETY FIRST 2.8. SAFETY DECALS DECAL #27709 DECAL #17101 PLACED ON MACHINE BEHIND GUARD DECAL #17102 DECAL #17098 DECAL #17097 Figure 2.
2. SAFETY FIRST 2.8. SAFETY DECALS WHEATHEART - GHR & WHR GRAIN AUGERS GRAIN AUGERS DECAL #17096 DECAL #17109 DECAL #19960 DECAL 317113 DECAL #17103 Figure 2.
WHEATHEART - GHR & WHR GRAIN AUGERS GRAIN AUGERS 3. ASSEMBLY 3.1. PRE-ASSEMBLY 3. Assembly Warning: Before continuing, ensure you have read and understand the relevant information in the safety section. Safety information is provided to help prevent serious injury, death, or property damage. 3.1. PRE-ASSEMBLY Before beginning assembly, familiarize yourself with all the sub-assemblies and hardware making up the auger. Have all parts on hand and arrange them for easy access.
3. ASSEMBLY 3.3. TRACK SHOE & TRACKSTOP WHEATHEART - GHR & WHR GRAIN AUGERS GRAIN AUGERS 2. Slide lower flight shaft onto upper flight shaft until flight ends butt together and flighting spiral matches up. Secure with two 5/8” x 4-1/2” grade 8 bolts and locknuts. Repeat, if necessary, for any remaining flight shafts. 3. Clean driveshaft coupler and driveshaft ends, then insert a 1/4" x 1-1/2" square key. 4.
WHEATHEART - GHR & WHR GRAIN AUGERS GRAIN AUGERS 3. ASSEMBLY 3.4. INTAKE HITCH Figure 3.3 Figure 3.4 3.4. INTAKE HITCH 1. Clean dirt and paint from lower flight stub and intake bushing. 2. Attach intake hitch to lower auger tube and tighten securely. 3. Maintain 1/2” (1.27 cm) clearance between bushing and end of flight. 4. Attach clevis to intake hitch with clevis pin and gripclip. Figure 3.5 Part Intake Hitch Clevis Pin 30661 R2 Size 7/16” x 1-1/4” bolt and locknut 3/4” Amt.
3. ASSEMBLY 3.5. PTO S-DRIVE & SHIELD WHEATHEART - GHR & WHR GRAIN AUGERS GRAIN AUGERS 3.5. PTO S-DRIVE & SHIELD See Figure 3.6. The driveshaft segments are factory installed, ready for connecting to the gearbox. Important: Note: Table 3.1. Horsepower Requirementsa 13” x 41’ Auger Length PTO–HP 41’ 60 51’ 70 61’ 80 71’ 90 1. Clean dirt and paint from driveshaft ends, inside couplers, and PTO driveline yoke. 2.
WHEATHEART - GHR & WHR GRAIN AUGERS GRAIN AUGERS 3. ASSEMBLY 3.6. EMD DRIVE Figure 3.6 3.6. EMD DRIVE See Figure 3.7 and 3.8. Important: 30661 R2 Table 3.2. Horsepower Requirementsa 13” x 41’ Auger Length ELECTRIC– HP 41’ 20 1. Remove the driveshaft segment nearest the intake end of auger (9’9" long). This driveshaft is not used on EMD augers. 2. Clean dirt and paint from driveshaft a. Approximate horsepower ends and inside couplers. requirements under normal conditions. When augering 3.
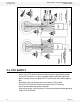
3. ASSEMBLY 3.6. EMD DRIVE WHEATHEART - GHR & WHR GRAIN AUGERS GRAIN AUGERS 8. Position electric motor mount beneath auger as shown, about 1-1/2" to 2" (3.81 cm - 5.08 cm) from gearbox assembly. Secure with two halfbands and four 7/16" x 1-1/4" bolts and locknuts. 9. Slide the 15" pulley onto gearbox shaft with hub facing gearbox. Insert 1/4" x 1-1/2" square key, then tighten securely. Figure 3.7 STEPS 10. THROUGH 17.
WHEATHEART - GHR & WHR GRAIN AUGERS GRAIN AUGERS 3. ASSEMBLY 3.6. EMD DRIVE Figure 3.8 16. Attach the guard to gearbox assembly by bolting the guard mount bracket to the short angle with one 3/8" x 3/4" bolt and washer locknut. 17. Secure the other end of guard by bolting the “wide” guard mount angle to the “narrow” guard mount angle with two 5/16" x 5" bolts and locknuts. Adjust the width of guard at the motor pulley to suit the pulley diameter.
3. ASSEMBLY 3.7. DRIVESHAFT SHIELD WHEATHEART - GHR & WHR GRAIN AUGERS GRAIN AUGERS 3.7. DRIVESHAFT SHIELD Before installing the driveshaft shields, refer to Table 3.3 for the proper sequence for your particular auger. Install shields working from the gearbox assembly up to the discharge end. To install: Note: 1. Place driveshaft shield against gearbox and over chain coupler guard, then secure with a guard strap and 2 self-tapping screws (Figure 3.6). 2.
WHEATHEART - GHR & WHR GRAIN AUGERS GRAIN AUGERS 3. ASSEMBLY 3.9. TRANSPORT UNDERCARRIAGE 3.9. TRANSPORT UNDERCARRIAGE See Figure 3.11 to 3.15. 1. To assemble undercarriage, fasten the lower reach arms to axle with three 7/16" x 1-1/4" bolts and locknuts on each side. 2. Attach long crossmember to bottom of undercarriage brackets as shown, with two 7/16" x 1-1/4" bolts and locknuts. 3. Attach the short crossmember to lower reach arms with two 1/2” x 1-1/4" bolts and locknuts. Note: Figure 3.11 4.
3. ASSEMBLY 3.9. TRANSPORT UNDERCARRIAGE WHEATHEART - GHR & WHR GRAIN AUGERS GRAIN AUGERS Figure 3.12 5. Fasten upper lift arms to lower reach arms with 3/4" x 2" bolts and locknuts. Do not over-tighten. Tighten snug only; these bolts act as pivot points. 6. Raise the discharge end of auger with a front end loader and a strong sling / chain or block and tackle. The height should be sufficient to clear undercarriage assembly. WARNING Do not remove tube support until auger is fully assembled. 7.
WHEATHEART - GHR & WHR GRAIN AUGERS GRAIN AUGERS 3. ASSEMBLY 3.10. WINCH & LIFT CABLE 8. Attach upper lift arms to roller track shoe with one 3/4" x 6-1/2" bolt and locknut. Do not over-tighten. Tighten snug only; this bolt acts as a pivot point (Figure 3.14). 9. Lower upper end of auger slowly until the roller track shoe rests against the track stop. 3.10. WINCH & LIFT CABLE 1. Attach cable to winch using one of the 2 methods shown, depending on supplied winch.
3. ASSEMBLY 3.11. UPPER HOUSING LUBRICATION WHEATHEART - GHR & WHR GRAIN AUGERS GRAIN AUGERS 3.10.1. WINCH HANDLE This auger may use one of several different winch models. Before installing handle on the main winch assembly, check the model number stamped on winch housing and follow the correct set of instructions. CAUTION Winch handle assembly must follow the instructions below. Improper assembly will result in sudden winch failure causing damage to equipment and/or personal injury. MODEL K2550 1.
WHEATHEART - GHR & WHR GRAIN AUGERS GRAIN AUGERS 3. ASSEMBLY 3.13. MODEL DECAL PLACEMENT 3.13. MODEL DECAL PLACEMENT Figure 3.20 Important: Do not cover any existing safety or instruction decals with the model decals. For most decal placement, follow the figure above. Apply decals to both sides of auger tube. Lower Tubes: Place decals just below the angle flange, centered on the tube. Decals must be easily seen from the ground when auger assembly is complete.
3. ASSEMBLY 3.13.
WHEATHEART - GHR & WHR GRAIN AUGERS GRAIN AUGERS 4. TRANSPORT & PLACEMENT 4.1. TRANSPORT PROCEDURE 4. Transport & Placement Warning: Before continuing, ensure you have read and understand the relevant information in the safety section. Safety information is provided to help prevent serious injury, death, or property damage. 4.1. TRANSPORT PROCEDURE Follow all safety precautions when transporting the auger and use a proper towing vehicle. Important: 1. If auger is raised, place in full down position.
4. TRANSPORT & PLACEMENT 4.2. PLACEMENT PROCEDURE WHEATHEART - GHR & WHR GRAIN AUGERS GRAIN AUGERS 5. Refer to “Transport & Placement Safety” on page 11 for important safety information before towing. CAUTION If auger wheels are partially or fully buried in snow or grain, failure to clear area around the wheels before moving may cause damage to the auger or result in serious injury. 4.2. PLACEMENT PROCEDURE Important: 1. Ensure towing hitch is in place and secure. Use a type of hitch pin (Figure 4.
WHEATHEART - GHR & WHR GRAIN AUGERS GRAIN AUGERS 4. TRANSPORT & PLACEMENT 4.2. PLACEMENT PROCEDURE WARNING Never attempt to increase height of auger by positioning wheels on lumber, clocks, or by any other means. To do so will result in damage to equipment and/or personal injury. Important: PTO Models Only: The driveline is non-separable. Remove from tractor and secure in transport saddle on auger before moving tractor away from auger. 6. Move the auger into working position slowly.
4. TRANSPORT & PLACEMENT 4.2.
WHEATHEART - GHR & WHR GRAIN AUGERS GRAIN AUGERS 5. OPERATION 5.1. AUGER DRIVE & LOCKOUT PROCEDURE 5. Operation Warning: Before continuing, ensure you have read and understand the relevant information in the safety section. Safety information is provided to help prevent serious injury, death, or property damage. Operators must observe safety procedures at all times and follow the pre-operational checklist before each start-up.
5. OPERATION 5.2. OPERATING PROCEDURE Drive Type PTO Driveline WHEATHEART - GHR & WHR GRAIN AUGERS GRAIN AUGERS Before Operation Lockout Before starting, ensure • PTO driveline is securely attached to the tractor and jackhaft • tractor park brake in engaged and/or wheels are chocked • you are not exceeding the maximum operating length of 80” (2016 mm) of the PTO driveline or maximum angle of 15° • PTO drive on the tractor is in the off position Shut off tractor’s engine and remove key from tractor.
WHEATHEART - GHR & WHR GRAIN AUGERS GRAIN AUGERS 5. OPERATION 5.2. OPERATING PROCEDURE After the initial start-up and inspection, the auger should be shut down and inspected at least three more times during the first 10 hours of operation. Keep operation of empty auger to a minimum, as this results in excessive wear. Once auger is broken in, the checklist should be a part of the daily routine before operating auger. 5.2.2. OPERATING WITH A FULL LOAD 1.
5. OPERATION 5.2. OPERATING PROCEDURE WHEATHEART - GHR & WHR GRAIN AUGERS GRAIN AUGERS 5.2.3. SHUTDOWN PTO NORMAL SHUTDOWN: 1. Near the end of a load, decrease auger speed until all grain is clear of machine. 2. When auger is clear of grain, disengage PTO drive. 3. Shut down and lock out tractor. EMERGENCY / FULL-TUBE RESTART: 1. If the auger is shut down for an emergency, lock out tractor before correcting the problem.
WHEATHEART - GHR & WHR GRAIN AUGERS GRAIN AUGERS 5. OPERATION 5.2. OPERATING PROCEDURE 5.2.4. LOWERING & COMPLETION After operation: 1. Clean entire work area. 2. Remove all supports and chocks. 3. Move auger out of working position and lower fully (see shaded box that follows for lowering procedure). 4. Move auger to the next work area or to a storage area and then clean out. LOWERING 1. 2. 3. 4. For PTO drives: disconnect driveline from tractor before lowering. Ensure area beneath auger is clear.
5. OPERATION 5.2.
WHEATHEART - GHR & WHR GRAIN AUGERS GRAIN AUGERS 6. MAINTENANCE & STORAGE 6.1. GENERAL MAINTENANCE PROCEDURES 6. Maintenance & Storage Warning: Before continuing, ensure you have read and understand the relevant information in the safety section. Safety information is provided to help prevent serious injury, death, or property damage. Proper maintenance habits on the 130-41’ auger mean a longer life for the machine and a more efficient and safer operation. 6.1.
6. MAINTENANCE & STORAGE 6.1. GENERAL MAINTENANCE PROCEDURES WHEATHEART - GHR & WHR GRAIN AUGERS GRAIN AUGERS Area Maintenance Note: Service winch with auger in fully lowered position and cable slack. Keep a film of grease on gears. Oil the ratchet pawl pivot, bushings, and pinion threads. Do not get oil or grease on brake discs. Replace brake discs if less than 1/16” thick. Check for proper ratchet pawl operation.
WHEATHEART - GHR & WHR GRAIN AUGERS GRAIN AUGERS 6. MAINTENANCE & STORAGE 6.2. GENERAL STORAGE PROCEDURES 6.2. GENERAL STORAGE PROCEDURES TO PROTECT AUGER IN STORAGE DURING THE OFF-SEASON: 1. Lower the auger to full down position with slight tension on the cable. 2. Lubricate all grease fittings according to the maintenance procedure. 3. Inspect auger for damage and note any repairs required. Order replacement parts from your dealer. 4.
6. MAINTENANCE & STORAGE 6.2.
WHEATHEART - GHR & WHR GRAIN AUGERS GRAIN AUGERS 7. TROUBLESHOOTING 7. Troubleshooting Problem Excessive noise or vibration. *Remember to follow proper break-in procedures—auger may run rough until tube is polished. If noise is extreme from outset or continuous after several loads of grade are fed, continue with troubleshooting below Possible Cause Chatter from wooden bearings. Truss cables incorrectly adjusted. Flighting peeled back due to plugging. Top drive inadequately lubricated.
7. TROUBLESHOOTING Problem Premature wear on auger tubes. 44 WHEATHEART - GHR & WHR GRAIN AUGERS GRAIN AUGERS Possible Cause Remedy Auger being run at low capacity or empty for extended period of time. Bent flighting. Frequently occurs on farms using grain wagons. Auger should not be left unattended when filling bins. Depending on application, a belt conveyor may be more appropriate. Flighting allowed to wear beyond normal point of replacement.
LIMITED WARRANTY Wheatheart warrants to the buyer that the new machinery is free from defects in material and workmanship. This warranty is only effective for any new machinery that has not been altered, changed, repaired, or treated since its delivery to the buyer, other than by Wheatheart or its authorized dealers or employees, and does not apply to accessories, attachments, tools, or parts sold or operated with the new machinery if they have not been manufactured by Wheatheart.
Wheatheart Part of the Ag Growth International Inc. Group P.O. Box 39 Rosenort, Manitoba, Canada R0G 1W0 Phone: (866) 467-7207 (Canada & USA) Fax: (866) 768-4852 website: www.wheatheart.com email: sales@wheatheart.com © Ag Growth International Inc.