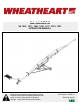
SA AUGERS SA 1061, 1071, 1081, 1091, 1371, 1381, 1391 OPERATION MANUAL Read this manual before using product. Failure to follow instructions and safety precautions can result in serious injury, death, or property damage. Keep manual for future reference.
This product has been designed and constructed according to general engineering standardsa. Other local regulations may apply and must be followed by the operator. We strongly recommend that all personnel associated with this equipment be trained in the correct operational and safety procedures required for this product. Periodic reviews of this manual with all employees should be standard practice. For your convenience, we include this sign-off sheet so you can record your periodic reviews.
WHEATHEART - SA AUGERS SA 1061, 1071, 1081, 1091, 1371, 1381, 1391 TABLE OF CONTENTS 1. Introduction .......................................................................................................................... 5 2. Safety First............................................................................................................................ 7 2.1. General Safety ......................................................................................................... 8 2.2.
WHEATHEART - SA AUGERS SA 1061, 1071, 1081, 1091, 1371, 1381, 1391 TABLE OF CONTENTS 5. Maintenance........................................................................................................................ 5.1. Fluids and Lubricants ............................................................................................. 5.2. Maintenance Intervals ............................................................................................ 5.3. Maintenance Procedures.......................
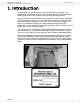
WHEATHEART - SA AUGERS SA 1061, 1071, 1081, 1091, 1371, 1381, 1391 1. INTRODUCTION 1. Introduction Congratulations on the purchase of your new Wheatheart SA Auger. This equipment will complement your agricultural operation by safely and efficiently moving grain, pulse crops, fertilizer, and any other granular materials. Many of the features incorporated into this machine are the result of suggestions made by customers like you.
1.
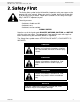
WHEATHEART - SA AUGERS SA 1061, 1071, 1081, 1091, 1371, 1381, 1391 2. SAFETY FIRST 2. Safety First The Safety Alert symbol to the left identifies important safety messages on the product and in the manual. When you see this symbol, be alert to the possibility of personal injury or death. Follow the instructions in the safety messages. Why is SAFETY important to you? Three big reasons: • Accidents disable and kill. • Accidents cost. • Accidents can be avoided.
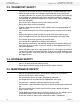
2. SAFETY FIRST 2.1. GENERAL SAFETY WHEATHEART - SA AUGERS SA 1061, 1071, 1081, 1091, 1371, 1381, 1391 2.1. GENERAL SAFETY Important: The general safety section includes instructions that apply to all safety practices. Any instructions specific to a certain safety practice (e.g., assembly safety), can be found in the appropriate section. Always read the complete instructional sections and not just these safety summaries before doing anything with the equipment.
WHEATHEART - SA AUGERS SA 1061, 1071, 1081, 1091, 1371, 1381, 1391 2. SAFETY FIRST 2.2. OPERATING SAFETY • Follow good shop practices: • keep service area clean and dry • be sure electrical outlets and tools are properly grounded • use adequate light for the job at hand • Think SAFETY! Work SAFELY! 2.2. OPERATING SAFETY • Ensure guards are installed and secure. • Clear the work area of untrained people. • Clean the work area to prevent slipping or tripping.
2. SAFETY FIRST 2.3. TRANSPORT SAFETY WHEATHEART - SA AUGERS SA 1061, 1071, 1081, 1091, 1371, 1381, 1391 2.3. TRANSPORT SAFETY • Ensure tires are inflated to the tire manufacturer’s recommended pressure. • Make sure that all lights and reflectors required by the local highway and transport authorities are in place, are functioning, and can be seen clearly by all overtaking and oncoming traffic.Check with local authorities regarding transportation of agricultural equipment on public roads.
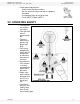
WHEATHEART - SA AUGERS SA 1061, 1071, 1081, 1091, 1371, 1381, 1391 2. SAFETY FIRST 2.6. SAFETY DECAL LOCATIONS 2.6. SAFETY DECAL LOCATIONS • Keep safety decals clean and legible at all times. • Replace safety decals that are missing or have become illegible. See decal location figures that follow. • Replaced parts must display the same decal(s) as the original part. • Safety decals are available from your distributor, dealer, or factory. 2.6.1. DECAL INSTALLATION 1.
2. SAFETY FIRST 2.6. SAFETY DECAL LOCATIONS WHEATHEART - SA AUGERS SA 1061, 1071, 1081, 1091, 1371, 1381, 1391 DECAL #27709 DECAL #17098 DECAL #17101 DECAL #17113 DECAL #17097 DECAL #17398 DECAL #17096 DECAL # 17378 NOT INCLUDED ON SA1061 Figure 2.
WHEATHEART - SA AUGERS SA 1061, 1071, 1081, 1091, 1371, 1381, 1391 2. SAFETY FIRST 2.6. SAFETY DECAL LOCATIONS DECAL #17099 DECAL #17107 DECAL #18859 DECAL #17094 DECAL #19960 PLACED ON MACHINE BEHIND GUARD DECAL #17531 DECAL #17101 DECAL #27709 DECAL #17098 Figure 2.4 DECAL # 27516 Figure 2.
2. SAFETY FIRST 2.6.
WHEATHEART - SA AUGERS SA 1061, 1071, 1081, 1091, 1371, 1381, 1391 3. TRANSPORT & PLACEMENT 3.1. TRANSPORT PROCEDURE 3. Transport & Placement Warning: Before continuing, please reread the safety information relevant to this section at the beginning of this manual. Failure to follow the safety instructions can result in serious injury, death, or property damage. DANGER Electrocution hazard: • This auger is not insulated. • Keep auger away from overhead power lines and devices.
3. TRANSPORT & PLACEMENT 3.1. TRANSPORT PROCEDURE WHEATHEART - SA AUGERS SA 1061, 1071, 1081, 1091, 1371, 1381, 1391 6. Open the hose valve and then use the tractor valve to lower the auger. Feather the lever to prevent too rapid a descent. Lower the auger until the transport brace is fully seated (Figure 3.1). 7. Raise intake feed hopper into transport position and secure with saddle pin and hairpin (Figure 3.2). a. Lock in transport position with the handle on the side of the hopper. b.
WHEATHEART - SA AUGERS SA 1061, 1071, 1081, 1091, 1371, 1381, 1391 3. TRANSPORT & PLACEMENT 3.2. PLACEMENT PROCEDURE b. Ensure there is no more slack in the chain than required for turning. c. When not in use, store the safety chain in a clean, dry place. Replace the safety chain if one or more links or end fittings are broken, stretched, or otherwise damaged or deformed (Figure 3.3). WARNING Maximum transport speed: Do not transport faster than 15 mph (24 km/h), or faster than road conditions allow.
3. TRANSPORT & PLACEMENT 3.2. PLACEMENT PROCEDURE Note: WHEATHEART - SA AUGERS SA 1061, 1071, 1081, 1091, 1371, 1381, 1391 Do not place anything under the wheels of the auger for added height. 6. Check that the valve on the cylinder hose is open to raise the auger and closed once the auger is in position. CAUTION If hose valve remains open, a loss of hydraulic pressure within the tractor system will allow the auger to lower inadvertently, damaging equipment and/or causing personal injury. Note: 7.
WHEATHEART - SA AUGERS SA 1061, 1071, 1081, 1091, 1371, 1381, 1391 4. OPERATION 4.1. DESCRIPTION OF THE EQUIPMENT 4. Operation Warning: Before continuing, please reread the safety information relevant to this section at the beginning of this manual. Failure to follow the safety instructions can result in serious injury, death, or property damage. 4.1.
4. OPERATION 4.2. OPERATOR CONTROLS WHEATHEART - SA AUGERS SA 1061, 1071, 1081, 1091, 1371, 1381, 1391 4.2. OPERATOR CONTROLS The hopper winch is located as shown in Figure 4.1. The hydraulic shut-off valve is located as shown in Figure 4.2. Please refer to the tractor manual for hydraulic and PTO controls. Figure 4.1 Winch Location Figure 4.2 Shut-off Valve 4.3. PRE-OPERATION 4.3.1. CHECKLIST • • • • • • • • • • • • 20 Tighten all fasteners. Adjust and/or lubricate boot chain and hopper chain.
WHEATHEART - SA AUGERS SA 1061, 1071, 1081, 1091, 1371, 1381, 1391 4. OPERATION 4.3. PRE-OPERATION 4.3.2. PTO DRIVE Correct operation of the Wheatheart SA auger requires pre-inspection of the drive system, operator knowledge on how to shut down the system, and a general monitoring of the system during operation. GENERAL INFORMATION Before starting the auger, ensure that: • • • • • • Note: The PTO driveline is securely attached to the auger shaft and to the tractor.
4. OPERATION 4.4. OPERATION PROCEDURE WHEATHEART - SA AUGERS SA 1061, 1071, 1081, 1091, 1371, 1381, 1391 4.4. OPERATION PROCEDURE DANGER Rotating Auger Hazard Contact with rotating flighting will result in amputation or severe laceration. DO NOT operate with guards removed or modified. Keep hands and feet away from rotating auger. Tie up long hair and remove jewelry. DO NOT wear loose-fitting clothing or items that could become caught. Shut off and lock out the power source before unplugging or cleaning.
WHEATHEART - SA AUGERS SA 1061, 1071, 1081, 1091, 1371, 1381, 1391 Important: 4. OPERATION 4.4. OPERATION PROCEDURE 9. Lock out the tractor and conduct a complete inspection of the auger following the checklist on page 20. After the initial start-up and inspection, the auger should be shut down and inspected at least 3 more times during the first 10 hours of operation. NOTICE Do not run an empty auger at high speed; this results in excessive wear. 4.4.2.
4. OPERATION 4.4. OPERATION PROCEDURE WHEATHEART - SA AUGERS SA 1061, 1071, 1081, 1091, 1371, 1381, 1391 4.4.4. EMERGENCY STOP / FULL-TUBE RESTART Although it is recommended that the machine be emptied before stopping, in an emergency situation: 1. Stop or shut down the power source immediately. 2. Stop the flow of material (if applicable). 3. Correct the emergency before resuming work. The tube may be filled with material if the machine is shut down inadvertently or for an emergency.
WHEATHEART - SA AUGERS SA 1061, 1071, 1081, 1091, 1371, 1381, 1391 4. OPERATION 4.4. OPERATION PROCEDURE Ensure the area in the path of the intake hopper is unobstructed. Use the winch control lever to lower the intake hopper to the ground. Unhook the winch cable from the hopper. The intake hopper can now be positioned using the power swing control lever. Traction can be controlled by adjusting the down pressure on the power swing wheels using the jack. Figure 4.
4. OPERATION 4.4.
WHEATHEART - SA AUGERS SA 1061, 1071, 1081, 1091, 1371, 1381, 1391 5. MAINTENANCE 5.1. FLUIDS AND LUBRICANTS 5. Maintenance Warning: Before continuing, please reread the safety information relevant to this section at the beginning of this manual. Failure to follow the safety instructions can result in serious injury, death, or property damage. NOTICE Do not modify equipment.
5. MAINTENANCE 5.3. MAINTENANCE PROCEDURES WHEATHEART - SA AUGERS SA 1061, 1071, 1081, 1091, 1371, 1381, 1391 5.3. MAINTENANCE PROCEDURES 5.3.1. VISUAL INSPECTION Before beginning visual inspection, check auger wheels and ensure that all operators are awayre of safety procedures. When inspecting, look for possible defects and for the following: • • • • • • • • • • • Be sure all guards are in place, functioning, and not damaged. Make sure access, service, and cleanout covers are in place and secure.
WHEATHEART - SA AUGERS SA 1061, 1071, 1081, 1091, 1371, 1381, 1391 5. MAINTENANCE 5.3. MAINTENANCE PROCEDURES 5.3.3. MACHINE GREASING Important: Most original equipment bearings used by Wheatheart are sealed units and will not accept grease. There are 8 grease fittings on the machine (shown in Figure 5.
5. MAINTENANCE 5.3. MAINTENANCE PROCEDURES WHEATHEART - SA AUGERS SA 1061, 1071, 1081, 1091, 1371, 1381, 1391 5.3.4. HOPPER LIFT CABLE INSPECTION Check the cable for damage such as fraying, kinking, or unwinding. Replace if damaged. To replace: 1. 2. 3. 4. Unwind the winch drum and remove the cable clamps. Free the cable from the winch and pulleys. Remove the cable clamps that secure the hook in place. Reverse the above steps to install the new cable. 5.3.5.
WHEATHEART - SA AUGERS SA 1061, 1071, 1081, 1091, 1371, 1381, 1391 Note: 5. MAINTENANCE 5.3. MAINTENANCE PROCEDURES 1. Remove chain cover plate from the boot or hopper. 2. Check chain slack. • Chain slack is checked at the midpoint of the longest span. It should be no more than 1/4” (6 mm). The Hopper has 2 chains, 1 for each flighting. 3. Adjust the chain slack. a. For the Boot: loosen the 4 bolts of the lower bearing and adjust the chain slack (Figure 5.3).
5. MAINTENANCE 5.3. MAINTENANCE PROCEDURES WHEATHEART - SA AUGERS SA 1061, 1071, 1081, 1091, 1371, 1381, 1391 2. Make sure the gearbox is half full (center of cross shaft) and free of foreign objects. Gearbox should be level when checking or refilling. Do not overfill. 5.3.8. MACHINE CLEANING 1. Clean out excess grain from auger tube, boot, and hopper. 2.
WHEATHEART - SA AUGERS SA 1061, 1071, 1081, 1091, 1371, 1381, 1391 5. MAINTENANCE 5.3. MAINTENANCE PROCEDURES • There is no slack in the cables. TIGHTENING CABLES The location of the cable adjustment eyebolts are shown in Figure 5.7. Note: The 1061 only has a long cable. 1. Lift the discharge end of the auger with a front end loader or rest on a bin so that the tube has a slight upward deflection at the discharge to give the cable some slack. 2.
5. MAINTENANCE 5.3. MAINTENANCE PROCEDURES WHEATHEART - SA AUGERS SA 1061, 1071, 1081, 1091, 1371, 1381, 1391 5.3.13. GEARBOX OIL 1. Place a pan under the drain plug. 2. Use a wrench and remove the drain plug. 3. Loosen the filler plug so air can enter the gearbox and the oil will drain freely (see Figure 5.5). 4. Allow the oil to drain completely. 5. Replace the drain plug. 6. Add oil until the gearbox is half full (center of cross shaft) and replace filler plug. A flexible funnel may be required.
WHEATHEART - SA AUGERS SA 1061, 1071, 1081, 1091, 1371, 1381, 1391 6. STORAGE 6. Storage Warning: Before continuing, please reread the safety information relevant to this section at the beginning of this manual. Failure to follow the safety instructions can result in serious injury, death, or property damage. WARNING To reduce the risk of injury or death, store in an area away from human activity and do not permit children to play on or around the stored machine.
6.
WHEATHEART - SA AUGERS SA 1061, 1071, 1081, 1091, 1371, 1381, 1391 7. TROUBLESHOOTING 7. Troubleshooting The following table lists the causes and solutions to some potential problems you may encounter in operating your swing-away auger. Table 7.1 PROBLEM The auger does not turn. The upper auger sections will not turn. Auger is noisy. The auger will not raise or lower. Low material augering rate. Auger will not stay in elevated position. Tube is misaligned.
7.
WHEATHEART - SA AUGERS SA 1061, 1071, 1081, 1091, 1371, 1381, 1391 8. APPENDIX 8.1. SPECIFICATIONS 8. Appendix 8.1. SPECIFICATIONS Important: Wheatheart Manufacturing reserves the right to change specifications without notice. Table 8.
8. APPENDIX 8.2. BOLT TORQUE VALUES WHEATHEART - SA AUGERS SA 1061, 1071, 1081, 1091, 1371, 1381, 1391 8.2. BOLT TORQUE VALUES The tables shown below give correct torque values for various bolts and capscrews. Tighten all bolts to the torque specified in the chart unless otherwise noted. Check tightness of bolts periodically, using bolt torque chart as your guide. Replace hardware with the same strength bolt. Table 8.
WHEATHEART - SA AUGERS SA 1061, 1071, 1081, 1091, 1371, 1381, 1391 8. APPENDIX 8.2. BOLT TORQUE VALUES Table 8.3 Metric Bolt Torque 30582 R7 BOLT DIAMETER M3 M4 M5 M6 M8 M10 M12 M14 M16 M20 M24 (Nm) (Lb-ft) (Nm) (Lb-ft) 0.5 3 6 10 25 50 90 140 225 435 750 0.4 2.2 4 7 18 37 66 103 166 321 553 1.8 4.5 9 15 35 70 125 200 310 610 1050 1.3 3.
8. APPENDIX 8.2.
WARRANTY REGISTRATION Wheatheart congratulates you on your new equipment purchase. The warranty registration form must be filled out within thirty (30) days from delivery date and sent to: Wheatheart Manufacturing Box 39 Rosenort, Manitoba, Canada, R0G 1WO CUSTOMER COPY (Retain this card for warranty and record purposes.
LIMITED WARRANTY Wheatheart warrants to the buyer that the new machinery is free from defects in material and workmanship. This warranty is only effective for any new machinery that has not been altered, changed, repaired, or treated since its delivery to the buyer, other than by Wheatheart or its authorized dealers or employees, and does not apply to accessories, attachments, tools, or parts sold or operated with the new machinery if they have not been manufactured by Wheatheart.
Wheatheart Part of the Ag Growth International Inc. Group P.O. Box 39 Rosenort, Manitoba, Canada R0G 1W0 Phone: (866) 467-7207 (Canada & USA) Fax: (866) 768-4852 website: www.wheatheart.com email: sales@wheatheart.ca © Ag Growth International Inc.