GRAIN AUGER EMD GHR 80 X 31’-71’ & 100 X 31’-71’ ASSEMBLY & OPERATION MANUAL Read this manual before using product. Failure to follow instructions and safety precautions can result in serious injury, death, or property damage. Keep manual for future reference.
This product has been designed and constructed according to general engineering standardsa. Other local regulations may apply and must be followed by the operator. We strongly recommend that all personnel associated with this equipment be trained in the correct operational and safety procedures required for this product. Periodic reviews of this manual with all employees should be standard practice. For your convenience, we include this sign-off sheet so you can record your periodic reviews.
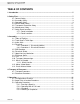
WHEATHEART - GRAIN AUGER EMD GHR 80 X 31’-71’ & 100 X 31’-71’ TABLE OF CONTENTS 1. Introduction .......................................................................................................................... 5 2. Safety First............................................................................................................................ 7 2.1. General Safety ......................................................................................................... 8 2.2.
WHEATHEART - GRAIN AUGER EMD GHR 80 X 31’-71’ & 100 X 31’-71’ TABLE OF CONTENTS 6. Maintenance & Storage...................................................................................................... 45 6.1. General Maintenance Procedures.......................................................................... 45 6.2. General Storage Procedures.................................................................................. 46 7. Troubleshooting ....................................................
WHEATHEART - GRAIN AUGER EMD GHR 80 X 31’-71’ & 100 X 31’-71’ 1. INTRODUCTION 1. Introduction Congratulations. As the new owner of a grain auger, you will be working with equipment designed to complement and improve your farming operation. Before using this auger, please read this manual and all safety labels and familiarize yourself with the various features of the machine and the necessary precautions for efficient and safe operation.
1.
WHEATHEART - GRAIN AUGER EMD GHR 80 X 31’-71’ & 100 X 31’-71’ 2. SAFETY FIRST 2. Safety First The Safety Alert symbol to the left identifies important safety messages on the product and in the manual. When you see this symbol, be alert to the possibility of personal injury or death. Follow the instructions in the safety messages. Why is SAFETY important to you? Three big reasons: • Accidents disable and kill. • Accidents cost. • Accidents can be avoided.
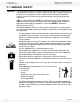
2. SAFETY FIRST 2.1. GENERAL SAFETY WHEATHEART - GRAIN AUGER EMD GHR 80 X 31’-71’ & 100 X 31’-71’ 2.1. GENERAL SAFETY Important: The general safety section includes instructions that apply to all safety practices. Any instructions specific to a certain safety practice (e.g., assembly safety), can be found in the appropriate section. Always read the complete instructional sections and not just these safety summaries before doing anything with the equipment.
WHEATHEART - GRAIN AUGER EMD GHR 80 X 31’-71’ & 100 X 31’-71’ 2. SAFETY FIRST 2.2. ASSEMBLY SAFETY • Follow good shop practices: • keep service area clean and dry • be sure electrical outlets and tools are properly grounded • use adequate light for the job at hand • Think SAFETY! Work SAFELY! 2.2. ASSEMBLY SAFETY • Read through the instructions to get to know the sub-assemblies and hardware that make up the equipment. • Do not take chances with safety.
2. SAFETY FIRST 2.3. OPERATION SAFETY WHEATHEART - GRAIN AUGER EMD GHR 80 X 31’-71’ & 100 X 31’-71’ Figure 2.
WHEATHEART - GRAIN AUGER EMD GHR 80 X 31’-71’ & 100 X 31’-71’ 2. SAFETY FIRST 2.4. ELECTRIC MOTOR SAFETY 2.4. ELECTRIC MOTOR SAFETY • Inspect the drive belts before using auger. Replace if frayed or damaged. • Do not grab or touch drive belts during operation for any reason. • Remember to ground electric motor before using auger. 2.5. TRANSPORT & PLACEMENT SAFETY • Transport auger in full down position with slight tension on cable. • Properly place hitch pin and securely attach safety chain.
2. SAFETY FIRST 2.6. MAINTENANCE SAFETY WHEATHEART - GRAIN AUGER EMD GHR 80 X 31’-71’ & 100 X 31’-71’ 2.6. MAINTENANCE SAFETY • Shut down and lock out all power before attempting maintenance of any kind. If applicable, disconnect PTO driveline from tractor or hydraulic hoses on units with hydraulic drive hoppers. • After maintenance is complete, replace and secure all safety guards and safety devices, and if applicable, service doors and cleanout covers.
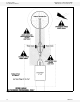
WHEATHEART - GRAIN AUGER EMD GHR 80 X 31’-71’ & 100 X 31’-71’ 2. SAFETY FIRST 2.7. SAFETY DECAL LOCATIONS DECAL #27709 DECAL #17109 PLACED ON MACHINE BEHIND GUARD DECAL #17101 DECAL #17096 DECAL #17113 DECAL #19960 DECAL #17097 DECAL #17102 DECAL #17098 Figure 2.
2. SAFETY FIRST 2.7.
WHEATHEART - GRAIN AUGER EMD GHR 80 X 31’-71’ & 100 X 31’-71’ 3. ASSEMBLY 3.1. TUBES & FLIGHTING 3. Assembly Warning: Before continuing, please reread the safety information relevant to this section at the beginning of this manual. Failure to follow the safety instructions can result in serious injury, death, or property damage. Before beginning assembly, familiarize yourself with all the sub-assemblies and hardware making up the auger. Have all parts on hand and arrange them for easy access.
3. ASSEMBLY 3.1. TUBES & FLIGHTING WHEATHEART - GRAIN AUGER EMD GHR 80 X 31’-71’ & 100 X 31’-71’ 3. Slide tube sections together and secure. Make sure to align upper and lower track ends and then tighten bolts. Secure with hardware in table below. FOR 8” AND 10” AUGERS, SLIDE FLIGHTING TOGETHER. Figure 3.
WHEATHEART - GRAIN AUGER EMD GHR 80 X 31’-71’ & 100 X 31’-71’ 3. ASSEMBLY 3.2. TRACK SHOE & TRACK STOP 3.2. TRACK SHOE & TRACK STOP 1. Slide roller track shoe onto track. 2. Attach the upper angle-iron track stop with 7/16” x 1" bolts, heavy flat washers, and locknuts (Figure 3.4). For correct positioning of the upper track stop, see Table 3.1. 3. Attach the lower angle-iron track stop (on 36’, 56’, and 61’ augers) with two 7/16” x 1" bolts and locknuts.
3. ASSEMBLY 3.3. INTAKE HITCH WHEATHEART - GRAIN AUGER EMD GHR 80 X 31’-71’ & 100 X 31’-71’ 4. Slide track shoe along full length of track to make certain there is no binding and that track ends are properly aligned. The upper and lower tracks must be aligned to allow track shoe to roll smoothly over this joint (Figure 3.3). 3.3. INTAKE HITCH 1. Clean dirt and paint from lower flight stub and intake bushing. 2. Attach intake hitch to lower auger tube and tighten securely. 3.
WHEATHEART - GRAIN AUGER EMD GHR 80 X 31’-71’ & 100 X 31’-71’ ¨ Note: 3. ASSEMBLY 3.4. DRIVESHAFT 3. Slip the lower driveshaft segment through the bearings on the lower tube section. Install a key and slide the shaft into the shaft connector. Driveshafts on the 10” x 51’, 61’, and 71’ augers require a square key. All other augers use Woodruff (half-moon shaped) keys. 4. Repeat for augers with two driveshaft additions. A 16' 4" driveshaft segment is strapped to the lower tube on the 8” x 71’ auger.
3. ASSEMBLY 3.4. DRIVESHAFT WHEATHEART - GRAIN AUGER EMD GHR 80 X 31’-71’ & 100 X 31’-71’ Figure 3.
WHEATHEART - GRAIN AUGER EMD GHR 80 X 31’-71’ & 100 X 31’-71’ 3. ASSEMBLY 3.5. EMD GEARBOX 3.5. EMD GEARBOX The EMD auger uses one of three gearbox assembly combinations depending on the size of the auger. The assembly is shipped with the appropriate mounting plate or gearbox mount and chain coupler in place. ¨ Gearbox mounting procedure for the following augers (Figure 3.7): • 8” x 31’ 1. Remove chain and secure half of the chain coupler to the driveshaft using a Woodruff key. 2.
3. ASSEMBLY 3.6. DRIVESHAFT SHIELD Note: ¨ 5. Place gearbox assembly with mounting plate onto the mounting bracket welded to lower tube and secure with four 7/16” x 1" bolts and locknuts. Maintain a minimum 1/16” clearance between chain coupler sprockets. Gearbox mounting procedure for the following augers (Figure 3.9): 6. 7. 8. 9. Important: WHEATHEART - GRAIN AUGER EMD GHR 80 X 31’-71’ & 100 X 31’-71’ • 8" x 56’-61’-71' • All 10" augers These augers are equipped with chain couplers.
WHEATHEART - GRAIN AUGER EMD GHR 80 X 31’-71’ & 100 X 31’-71’ ¨ ¨ 3. ASSEMBLY 3.6. DRIVESHAFT SHIELD 2. Attach chain coupler guard on all 8" augers up to and including 51': a. Attach shield to gearbox as shown in Figure 3.7 and with two 3/8” x 3/4” bolts and lockwashers. b. Attach the first driveshaft shield to the shield with one 1/4” x 1/2” bolt, a washer-locknut, and a punched flat iron plate. 3. Attach chain coupler guard on 8" x 56'-61'-71' and all 10" augers: a.
3. ASSEMBLY 3.7. UPPER HOUSING LUBRICATION WHEATHEART - GRAIN AUGER EMD GHR 80 X 31’-71’ & 100 X 31’-71’ Table 3.
WHEATHEART - GRAIN AUGER EMD GHR 80 X 31’-71’ & 100 X 31’-71’ Important: Important: Important: 3. ASSEMBLY 3.9. TRUSS 3. Attach eyebolt to one end of truss cable with two 5/16” cable clamps. Insert eyebolt into lower truss anchor and thread on nut a short way. On the 8” x 56’ augers, the truss cable must be threaded through the reach-arm bracket as shown in Figure 3.12 and then attached to the eyebolts at the lower truss anchor. 4.
3. ASSEMBLY 3.9. TRUSS WHEATHEART - GRAIN AUGER EMD GHR 80 X 31’-71’ & 100 X 31’-71’ Figure 3.13 Figure 3.
WHEATHEART - GRAIN AUGER EMD GHR 80 X 31’-71’ & 100 X 31’-71’ ¨ Important: 30642 R0 3. ASSEMBLY 3.9. TRUSS Figure 3.15 8. For 71’ augers only (Figure 3.15): a. Fasten short truss anchor (A) to lower auger tube with 7/16” x 1" bolts and locknuts. b. Fasten high truss support bracket to mount (C) on bottom of center tube with 7/16” x 1" bolts and locknuts. c. Attach eyebolt to one end of truss cable with two 5/16” cable clamps, then insert eyebolt into short truss anchor and thread on nut a short way. d.
3. ASSEMBLY 3.10. TRANSPORT UNDERCARRIAGE WHEATHEART - GRAIN AUGER EMD GHR 80 X 31’-71’ & 100 X 31’-71’ 3.10. TRANSPORT UNDERCARRIAGE ¨ ¨ ¨ 1. To assemble undercarriage, fasten the lower reach arms to axle with three 7/16” x 1" bolts and locknuts on each side. • The 10" x 51' auger and all 56’, 61’ and 71’ augers require 1/2” x 1-1/4” bolts and locknuts. 2. Attach long crossmember to bottom of undercarriage brackets as shown in Figure 3.16, with two 7/16” x 1" bolts and locknuts.
WHEATHEART - GRAIN AUGER EMD GHR 80 X 31’-71’ & 100 X 31’-71’ Note: ¨ 3. ASSEMBLY 3.10. TRANSPORT UNDERCARRIAGE Installing tires may not leave you with enough clearance to position and attach undercarriage once auger tube is raised. If so, install wheels after assembly is complete. g. Install tires and tubes on the rims provided. Inflate according to recommendation on tire side-wall. Wheels may be mounted on hubs at this time with six 1/2” x 1-3/4” wheel bolts. 7.
3. ASSEMBLY 3.10. TRANSPORT UNDERCARRIAGE ¨ ¨ 30 WHEATHEART - GRAIN AUGER EMD GHR 80 X 31’-71’ & 100 X 31’-71’ 9. Position transport undercarriage beneath tube assembly and attach lower reach arms (Figure 3.18) or extension arms (Figure 3.17) to reach arm bracket on bottom tube with 5/8” x 1-1/2” bolts and locknuts. Do not overtighten. Figure 3.18 Tighten snug only; these bolts act as pivot points. • The 8" x 56’-61’-71' and the 10" x 51’-61’-71' augers require 3/4” x 2" bolts and locknuts. 10.
WHEATHEART - GRAIN AUGER EMD GHR 80 X 31’-71’ & 100 X 31’-71’ Important: ¨ ¨ 30642 R0 3. ASSEMBLY 3.10. TRANSPORT UNDERCARRIAGE c. Next, fasten flat braces (B) to first set of holes (furthest from intake) on stabilizer braces (A) with one 7/16” x 1-3/4” bolt and locknut. Place one 7/16” x 1" bolt and locknut in the other hole of the stabilizer Figure 3.20 brace. Where applicable, make sure that the lower reach arms are attached to the proper reach arm bracket (Figure 3.13, 3.14). 11.
3. ASSEMBLY 3.11. WINCH & LIFTCABLE WHEATHEART - GRAIN AUGER EMD GHR 80 X 31’-71’ & 100 X 31’-71’ • Use a c-clamp vise grip to squeeze and hold the tube clamps in position for attachment to the tubing cross braces. Once in position, tighten the bolts (Figure 3.22). Figure 3.22 3.11. WINCH & LIFTCABLE Important: 1. Attach cable to winch using one of the 2 methods shown, depending on supplied winch. • If method 2 is used, the nut must be on the outside of the drum to prevent damage to the cable.
WHEATHEART - GRAIN AUGER EMD GHR 80 X 31’-71’ & 100 X 31’-71’ 3. ASSEMBLY 3.11. WINCH & LIFTCABLE Figure 3.24 Figure 3.23 Note: On augers equipped with a lower angle-iron track stop, the cable must be threaded between track stop and auger tube to cable rests on top of the track stop (See Figure 3.24). 5. Wrap cable 1-1/2 times around the cable attach rod and secure with two 1/4” cable clamps. Position cable clamps as shown in Figure 3.24 and 3.25. Tighten clamps Figure 3.25 securely.
3. ASSEMBLY 3.12. MOTOR / MOTOR MOUNT WHEATHEART - GRAIN AUGER EMD GHR 80 X 31’-71’ & 100 X 31’-71’ MODEL K1051 & K1550 See Figure 3.26. 1. Slide handle over flat sides of input shaft. 2. Fasten with 1/2” locknut. Important: Do not remove or loosen the double locknut on the input shaft: it is an important part of the brake system of the winch. Figure 3.26 MODEL K2550 See Figure 3.27. 1. Slide handle over flat sides of input shaft. 2. Fasten with 1/2” locknut.
WHEATHEART - GRAIN AUGER EMD GHR 80 X 31’-71’ & 100 X 31’-71’ 3. ASSEMBLY 3.12. MOTOR / MOTOR MOUNT Figure 3.29 4. Attach pulley guard backplate to pulley guard bracket with two 1/4” x 1/2” bolts and whiznuts (Figure 3.30). Leave bolts / nuts loose to be tightened later. 5. Slide 13" pulley onto gearbox shaft with the pulley hub facing the gearbox. Insert a 1/4” x 1-1/2” square key and tighten set screws. Figure 3.
3. ASSEMBLY 3.13. PLASTIC MANUAL HOLDER WHEATHEART - GRAIN AUGER EMD GHR 80 X 31’-71’ & 100 X 31’-71’ When using an electric motor: • The motor and controls should be installed by a qualified electrician in accordance with all local and national codes. • Incorporate a magnetic starter to protect the motor. • The motor must have a manual reset button. • Locate reset and starter controls so that the operator has full view of the entire operation.
WHEATHEART - GRAIN AUGER EMD GHR 80 X 31’-71’ & 100 X 31’-71’ 4. TRANSPORT & PLACEMENT 4.1. TRANSPORT PROCEDURE 4. Transport & Placement Warning: Before continuing, please reread the safety information relevant to this section at the beginning of this manual. Failure to follow the safety instructions can result in serious injury, death, or property damage. 4.1. TRANSPORT PROCEDURE Follow all safety precautions when transporting the auger and use a proper towing vehicle. Important: 1.
4. TRANSPORT & PLACEMENT 4.2. PLACEMENT PROCEDURE WHEATHEART - GRAIN AUGER EMD GHR 80 X 31’-71’ & 100 X 31’-71’ 4. Beware of overhead obstructions and electrical wires and devices. The EMD augers have minimum clearances from 7'6" (2.29 m) to 15'6" (4.72 m) in normal transport position. 5. Refer to “Transport & Placement Safety” on page 11 for important safety information before towing. 4.2. PLACEMENT PROCEDURE Important: 1. Ensure towing hitch is in place and secure.
WHEATHEART - GRAIN AUGER EMD GHR 80 X 31’-71’ & 100 X 31’-71’ Important: Important: 4. TRANSPORT & PLACEMENT 4.2. PLACEMENT PROCEDURE When releasing auger from the towing vehicle, test the intake end for downward weight. Do not raise the intake end above drawbar height. When the intake end is elevated too high with auger in raised position, the balance of weight quickly transfers to the discharge end, causing it to upend. Ensure proper anchoring/ support. 7.
4. TRANSPORT & PLACEMENT 4.2.
WHEATHEART - GRAIN AUGER EMD GHR 80 X 31’-71’ & 100 X 31’-71’ 5. OPERATION 5.1. PRE-OPERATIONAL CHECKLIST 5. Operation Warning: Before continuing, please reread the safety information relevant to this section at the beginning of this manual. Failure to follow the safety instructions can result in serious injury, death, or property damage. 5.1.
5. OPERATION 5.3. OPERATING PROCEDURE WHEATHEART - GRAIN AUGER EMD GHR 80 X 31’-71’ & 100 X 31’-71’ 5.3. OPERATING PROCEDURE 5.3.1. START-UP & BREAK-IN Important: 1. Properly place auger and complete the pre-operational checklist at the beginning of this chapter. If everything is satisfactory, prepare for a 30-minute operation at half speed. 2. Correctly position portable grain hopper secure it to the auger with both straps (where applicable). Anchor and/or support auger during operation.
WHEATHEART - GRAIN AUGER EMD GHR 80 X 31’-71’ & 100 X 31’-71’ 5. OPERATION 5.3. OPERATING PROCEDURE DANGER Rotating Flighting Hazard! To prevent death or serious injury: • Keep away from rotating auger flighting. • Do not remove or modify auger flighting guards, doors, or covers. Keep in good working order. Have replaced if damaged. • Do not operate the auger without all guards, doors, and covers in place. • Never touch the auger flighting. Use a stick or other tool to remove an obstruction or clean out.
5. OPERATION 5.3. OPERATING PROCEDURE WHEATHEART - GRAIN AUGER EMD GHR 80 X 31’-71’ & 100 X 31’-71’ • If the problem is plugging, clear as much of the grain as possible using a piece of wood, vacuum cleaner, or other tool before restarting auger. Do not reach in and use your hands (See Auger Drive & Lockout Procedure on page 41.) NOTICE Starting the auger under load may result in damage to unit. Be sure there is no blockage. 5.3.4.
WHEATHEART - GRAIN AUGER EMD GHR 80 X 31’-71’ & 100 X 31’-71’ 6. MAINTENANCE & STORAGE 6.1. GENERAL MAINTENANCE PROCEDURES 6. Maintenance & Storage Warning: Before continuing, please reread the safety information relevant to this section at the beginning of this manual. Failure to follow the safety instructions can result in serious injury, death, or property damage. Proper maintenance habits on the EMD auger mean a longer life, better efficiency, and safer operation. 6.1.
6. MAINTENANCE & STORAGE 6.2. GENERAL STORAGE PROCEDURES Area WHEATHEART - GRAIN AUGER EMD GHR 80 X 31’-71’ & 100 X 31’-71’ Maintenance Winch Note: Service winch with auger in fully lowered position and cable slack. Keep a film of grease on gears. Oil the ratchet pawl pivot, bushings, and pinion threads. Do not get oil or grease on brake discs. Replace brake discs if less than 1/16” thick. Check for proper ratchet pawl operation.
WHEATHEART - GRAIN AUGER EMD GHR 80 X 31’-71’ & 100 X 31’-71’ 6. MAINTENANCE & STORAGE 6.2. GENERAL STORAGE PROCEDURES TO PREPARE AUGER FOR USE AFTER STORAGE: Note: 30642 R0 1. Check tire pressure and inflate to 18-24 psi (124-165 kPa) if necessary. 2. Tow auger to worksite, being mindful of electrical wires overhead (See step 4. on page 10 for correct procedures). 3. Remove protective covering from motor. 4. Replace any damaged parts and decals. 5.
6. MAINTENANCE & STORAGE 6.2.
WHEATHEART - GRAIN AUGER EMD GHR 80 X 31’-71’ & 100 X 31’-71’ 7. TROUBLESHOOTING 7. Troubleshooting Problem Excessive noise or vibration. *Remember to follow proper break-in procedures—auger may run rough until tube is polished. If noise is extreme from outset or continuous after several loads of grade are fed, continue with troubleshooting below Possible Cause Chatter from wooden bearings. Truss cables incorrectly adjusted. Flighting peeled back due to plugging. Top drive inadequately lubricated.
7. TROUBLESHOOTING Problem Premature wear on auger tubes. 50 WHEATHEART - GRAIN AUGER EMD GHR 80 X 31’-71’ & 100 X 31’-71’ Possible Cause Remedy Auger being run at low capacity or empty for extended period of time. Bent flighting. Frequently occurs on farms using grain wagons. Auger should not be left unattended when filling bins. Depending on application, a belt conveyor may be more appropriate. Flighting allowed to wear beyond normal point of replacement.
WARRANTY REGISTRATION Wheatheart congratulates you on your new equipment purchase. The warranty registration form must be filled out within thirty (30) days from delivery date and sent to: Wheatheart Manufacturing Box 39 Rosenort, Manitoba, Canada, R0G 1WO CUSTOMER COPY (Retain this card for warranty and record purposes.
LIMITED WARRANTY Wheatheart warrants to the buyer that the new machinery is free from defects in material and workmanship. This warranty is only effective for any new machinery that has not been altered, changed, repaired, or treated since its delivery to the buyer, other than by Wheatheart or its authorized dealers or employees, and does not apply to accessories, attachments, tools, or parts sold or operated with the new machinery if they have not been manufactured by Wheatheart.
Wheatheart Part of the Ag Growth International Inc. Group P.O. Box 39 Rosenort, Manitoba, Canada R0G 1W0 Phone: (866) 467-7207 (Canada & USA) Fax: (866) 768-4852 website: www.wheatheart.com email: sales@wheatheart.ca © Ag Growth International Inc.