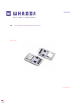
MANUAL EN microSD Card Logging Shield for Arduino® WPI304N whadda.
Introduction To all residents of the European Union Important environmental information about this product This symbol on the device or the package indicates that disposal of the device after its lifecycle could harm the environment. Do not dispose of the unit (or batteries) as unsorted municipal waste; it should be taken to a specialized company for recycling. This device should be returned to your distributor or to a local recycling service. Respect the local environmental rules.
What is Arduino® Arduino® is an open-source prototyping platform based on easy-to-use hardware and software. Arduino® boards are able to read inputs – light-on sensor, a finger on a button or a Twitter message – and turn it into an output – activating of a motor, turning on an LED, publishing something online. You can tell your board what to do by sending a set of instructions to the microcontroller on the board.
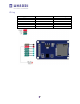
Wiring Logging shield CS (cable select) SCK (CLK) MOSI MISO 5V (4.5V-5.
Circuit Diagram 5
Operation Introduction The WPI304N SD card module is especially useful for projects that require data logging. Arduino® can create a file onto an SD card to write and save data, using the standard SD library from Arduino® IDE. The WPI304N module uses the SPI communication protocol. Preparing the microSD card The first step when using the WPI304N SD card module with Arduino®, is formatting the microSD card as a FAT16 or FAT32 file system. Follow the instructions below: 1.
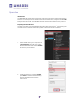
Using the SD card module Insert the formatted microSD card in the SD card module. Connect the SD card module to the Arduino® Uno as shown in the circuit below, or check the pin assignment table in a previous section. Coding SD card info To make sure everything is wired correctly, and the SD card is working, go to File → Examples → SD → CardInfo in the Arduino® IDE software. Now, upload the code to your Arduino® Uno board. Make sure to select the right board and COM port.
Reading and writing data onto the microSD card The SD library provides useful functions which allows to easily write onto and read from an SD card. Open the ReadWrite example from File → Examples → SD → ReadWrite and upload it to your Arduino® Uno board. Code 1. 2. 3. 4. 5. 6. 7. 8. 9. 10. 11. 12. 13. 14. 15. 16. 17. 18. 19. 20. 21. 22. 23. 24. 25. 26. 27.
28. Serial.begin(9600); 29. while (!Serial) { 30. ; // wait for serial port to connect. Needed for native USB port only 31. } 32. 33. 34. Serial.print("Initializing SD card..."); 35. 36. if (!SD.begin(4)) { 37. Serial.println("initialization failed!"); 38. while (1); 39. } 40. Serial.println("initialization done."); 41. 42. // open the file. note that only one file can be open at a time, 43. // so you have to close this one before opening another. 44. myFile = SD.open("test.txt", FILE_WRITE); 45. 46.
Once the code is uploaded and everything is okay, the following window appears on the serial monitor. This indicates reading/writing was successful. To check about the files on the SD card, use Notepad to open the TEST.TXT file on the microSD card. Following data appears in .
NonBlockingWrite.ino example In the original example NonBlockingWrite code, change line 48 if (!SD.begin()) { to if (!SD.begin(4)) { Also, add following lines after line 84: // print the buffer length. This will change depending on when // data is actually written to the SD card file: Serial.print("Unsaved data buffer length (in bytes): "); Serial.println(buffer.length()); // note the time that the last line was added to the string The complete code should be as follows: 1. 2. 3. 4. 5. 6. 7. 8. 9. 10. 11.
32. String buffer; 33. 34. unsigned long lastMillis = 0; 35. 36. void setup() { 37. Serial.begin(9600); 38. while (!Serial); 39. Serial.print("Initializing SD card..."); 40. 41. // reserve 1kB for String used as a buffer 42. buffer.reserve(1024); 43. 44. // set LED pin to output, used to blink when writing 45. pinMode(LED_BUILTIN, OUTPUT); 46. 47. // init the SD card 48. if (!SD.begin(4)) { 49. Serial.println("Card failed, or not present"); 50. Serial.println("initialization failed. Things to check:"); 51.
85. 86. 87. 88. 89. 90. 91. 92. 93. 94. 95. 96. 97. 98. 99. 100. 101. 102. 103. 104. 105. // print the buffer length. This will change depending on when // data is actually written to the SD card file: Serial.print("Unsaved data buffer length (in bytes): "); Serial.println(buffer.
whadda.com Modifications and typographical errors reserved - © Velleman Group nv. WPI304N_v01 Velleman Group nv, Legen Heirweg 33 - 9890 Gavere.