
User Manual


6
INSTALLING YOUR REFRIGERATOR
INSTALLATION
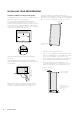
Adequate ventilation around your refrigerator.
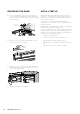
The diagram below shows the recommended airspace to
allow for ventilation of your refrigerator.
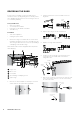
If you don’t have a cupboard with a rear gap, the
recommended clearance area on top increases from
50mm to 90mm (x) and from 32mm to 72mm (y). When
positioned in a corner area, spacing of at least 350mm
on the hinge side will allow the doors to open enough to
enable the removal of bins and shelves.
50mm (75mm max)
30mm
30mm
Cabinet
Door
Recommended
airspace
x
y
Note: Doors are designed to sit proud of cabinetry
(not flush).
The clearances shown above are the recommended
minimum clearances. The clearance at the rear must not
exceed 75mm.
550mm for telescopic
drawer models
350mm
When positioned in a corner area, spacing of at least
350mm on the hinge side will allow the door to open
enough to enable the removal of bins and shelves.
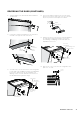
Your new refrigerator should arrive with the front
adjustable feet wound down, to tilt the top backwards by
about 10mm from upright. This will allow your refrigerator
door to self-close, providing a consistent closed seal.
10– 15mm
Height adjustable
front feet
1. Manouver the refrigerator into place.
2. The top of the refrigerator should be tilted back by
10mm (see diagram above). This will allow the doors
to self-close providing a consistent door seal.
3. If the refrigerator isn’t tilted back, you can adjust the
two front feet by hand or with a suitable spanner.
4. Check the alignment of the refrigerator to the
surrounding cupboards to see if it is level. You can
adjust the level with the feet as detailed in step 3.
aligned to cupboards
ie. even gap
Adjust front feet
for uneveness of floor
eg. wind this foot
down or up
top of refrigerator is
level ie. horizontal