
User`s guide

3-1
3. Getting Started
This section describes a simplified installation procedure for the VMR/NPS series
hardware which will allow you to communicate with the unit in order to demonstrate
basic features and check for proper operation. In order to take full advantage of the
features provided by this unit it is recommended that you should also refer to the
remainder of this User’s Guide.
3.1. Installing the VMR or NPS Hardware
3.1.1. Apply Power to the VMR or NPS
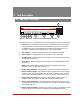
Refer to power rating nameplate on the VMR or NPS unit, and then connect the unit to
an appropriate power source. Note that some VMR/NPS models feature two separate
AC inputs and two separate power branches, while others feature a single power inlet.
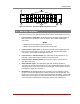
Connect power cable(s) to the Power Inlet(s), install the cable keeper(s) (as described
in Section 4.1.1), then connect the cables to an appropriate power supply. Refer to the
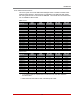
table in Section 1 for information concerning power requirements and maximum load.
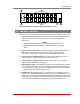
Note: To determine the exact model number for your VMR or NPS unit, either
refer to the nameplate on the back of the unit, or access command mode as
described in Section 5.1 and then type /J * and press [Enter].