
User`s guide
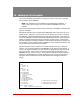


Table Of Contents
- Figure 2.1: VMR Series - Front Panel (Model VMR-16HD20-1 Shown)
- Figure 2.2: VMR Series - Back Panel (Model VMR-16HD20-1 Shown)
- Figure 2.3: NPS Series - Front Panel (Model NPS-16HD20-1 Shown)
- Figure 2.4: NPS Series - Back Panel (Model NPS-16HD20-1 Shown)
- Figure 5.1: Boot Priority Example 1
- Figure 5.2: Boot Priority Example 2
- Figure 9.1: The Help Menu (Administrator Mode; Text Interface - VMR Shown)
- Figure 14.1: Web Access Parameters (Text Interface Only)
- Figure B.1: RS232 SetUp Port Interface
- 1. Introduction
- 2. Unit Description
- 3. Getting Started
- 4. Hardware Installation
- 5. Basic Configuration
- 5.1. Communicating with the VMR or NPS Unit
- 5.2. Configuration Menus
- 5.3. Defining System Parameters
- 5.4. User Accounts
- 5.5. Managing User Accounts
- 5.6. The Plug Group Directory
- 5.7. Defining Plug Parameters
- 5.8. Serial Port Configuration
- 5.9. Network Configuration
- 5.10. Save User Selected Parameters
- 6. Reboot Options
- 7. Alarm Configuration
- 8. The Status Screens
- 9. Operation
- 10. SSH Encryption
- 11. Syslog Messages
- 12. SNMP Traps
- 13. Operation via SNMP
- 14. Setting Up SSL Encryption
- 15. Saving and Restoring Configuration Parameters
- 16. Upgrading VMR/NPS Firmware
- 17. Command Reference Guide
- Appendix A. Specifications
- Appendix B. Interface Descriptions
- Appendix C. Customer Service
- Index

14-2
Saving and Restoring Configuration Parameters
14.1. Creating a Self Signed Certificate
To create a Self Signed certificate, access the Text interface via Telnet or SSH, using a
password that permits access to Administrator level commands and then proceed as
follows:
1. Type /N and press [Enter] to display the Network Parameters menu.
2. At the Network Parameters menu, type 23 and press [Enter] to display the
Web Access menu (Figure 14.1.) Type 3 and press [Enter] and then follow the
instructions in the resulting submenu to enable HTTPS access.
3. Next, use the Web Access menu to define the following parameters.
Note: When configuring the VMR/NPS, make certain to define all of the
following parameters. Although most SSL applications require only the
Common Name, in the case of the VMR/NPS all of the following parameters are
mandatory.
• 5.CommonName: A domain name, that will be used to identify the VMR/NPS
unit. If you will use a Self Signed certificate, then this name can be any name
that you choose, and there is no need to set up your domain name server to
recognize this name. However, if you will use a Signed certificate, then your
domain name server must be set up to recognize this name (e.g., service.wti.
com.)
• 6.StateorProvince: The name of the state or province where the VMR/NPS
unit will be located (e.g., California.)
• 7.Locality: The city or town where the VMR/NPS unit will be located (e.g.,
Irvine.)
• 8.Country: The two character country code for the nation where the VMR/NPS
will be located (e.g., US.)
• 9.EmailAddress: An email address, that can be used to contact the person
responsible for the VMR/NPS (e.g., jsmith@yourcompany.com.)
• 10.OrganizationalName: The name of your company or organization
(e.g., Western Telematic.)
• 11.OrganizationalUnit: The name of your department or division; if necessary,
any random text can be entered in this field (e.g., tech support.)