
Assembly Instruction

To Assemble:
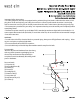
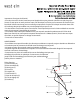
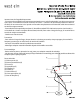
1. Insert the Top Tube (A) through the holes in the Pivots (D) of both the Assembled Arms (B).
2. Attached the Bottom Tube (F) onto the end of Top Tube (A) and turn the Bottom Tube (F) in a clockwise
direction to tighten.
3. Attach the Lamp Base (G) onto the end of Bottom Tube (F) and turn the Lamp Base (G) in a clockwise direc-
tion to tighten.
4. Attach the both Handgrips (E) onto the end of Assembled Arms (B) and turn the Handgrips (E) in a clock-
wise direction to tighten.
5. Insert TWO bulb-Max 60 watt maximum TYPE A standard incandescent light bulb (not included) or 13-
watt compact uorescent bulb (included) into the Sockets (I). DO NOT EXCEED SPECIFIED WATTAGE.
5. Plug xture into the proper electrical outlet and test xture.
Note:
• The Assembled Arms (B) can move back and forth through the Pivots (D) by unscrewing and screwing the
Adjustment Keys (H).
• The Assembled Arms (B) can move up and down along the Top Tube (A) and Bottom Tube (F) by unscrew-
ing and screwing the Adjustment Keys (H). .
• To adjust the Shade Angle, only hold the bottom edges of Shades (C).
Care instructions:
• Wipe clean with a soft, dry cloth or static duster.
• Always avoid the use of harsh chemicals or abrasive cleaners as they may cause damage to the xture’s
nish.