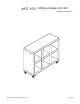
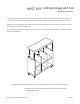
: rolling storage unit 3x2 assembly instructions 4579728/4579736/6875579/9740887- 3/05 page 1 of 9
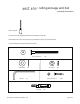
: rolling storage unit 3x2 assembly instructions ! Tools required: ! Do not throw away packaging materials until assembly is complete. ! Assemble this item on a soft surface, such as cardboard or carpet, to protect the finish. ! Proper assembly of this piece requires two people.
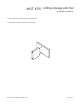
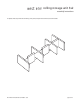
: rolling storage unit 3x2 assembly instructions 1. Place one of the two side panels on its side as shown. 2. Insert dowels on shelf into holes on the side panel.
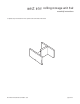
: rolling storage unit 3x2 assembly instructions 3. Repeat step 2 and attach an inner panel to the other side of the shelf.
: rolling storage unit 3x2 assembly instructions 4. Repeat these steps with the remaining inner panel, side panel and shelves as shown below.
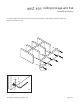
: rolling storage unit 3x2 assembly instructions 5. Attach the bottom panel to the side and inner panels with bolts (A), metal washers (B) and lock washers (C). Tighten with the allen key (D).
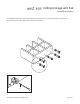
: rolling storage unit 3x2 assembly instructions 6. (OPTIONAL) Attach the 5 casters to the bottom panel with screws (E). Place 4 locking casters at corners and 1 non-locking caster in center. Tighten with philips head screwdriver.
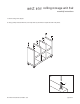
: rolling storage unit 3x2 assembly instructions 7. Set the storage unit upright. 8. Using a philips head screwdriver, screw snap-locks (F) into holes on top of side and inner panels.
: rolling storage unit 3x2 assembly instructions 10. Align the holes on the top panel with the snap-lock pegs on the top of the inner and side panels. Ensure fingers and body parts are clear of the connecting pieces. Firmly press down on the top panel until each peg snaps into place. While this is a secure connection for assembly, this item should not be lifted by the top panel for your safety, as it could disengage from the rest of the shelving unit.