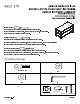
* - 3 - 4 " " / ) ' & ! " " ! " " ) ' , ! 0 ! ! " ' " # , " " ( ' + ! ' " # &
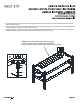
1. Place stand upside down on a soft surface. Attach legs with bolts (A), lock washer (B), and metal washers (C)as shown below. Tighten with allen key (D). 1. Placer le support à l’envers sur une surface molle. Fixer les pieds avec des boulons (A), la rondelle (B), et les rondelles métalliques (C), comme illustré ci-dessous. Serrez avec la clé allen (D). 1. Coloque el soporte en posición invertida sobre una superficie blanda.
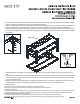
2. Lay the top panel onto a clean smooth surface such as carpet or cardboard. Align legs. Insert bolts (A), lock washer (B), and flat washer (C). Tighten with supplied hex key (D). With help flip stand upright. 2. Poser le panneau supérieur sur une surface propre et lisse comme la moquette ou du carton. Aligner les jambes. Insérez les bou lons (A), la rondelle (B), et la rondelle plate (C). Serrez avec la clé hexagonale fournie (D). Avec l’aide de tenir debout flip. 2.
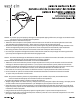
back side wall NOTICE: To prevent injury and property damage from unexpected tipping of furniture, we highly recommend installa tion of the anti-tip kit included with this product. Attaching furniture to wall with anti-tip kits. 1. Determine where the piece is to be placed and mark location on the wall for the mounting bracket screw holes. They should be placed approximately 1” below the top on the back of the piece of furniture. 2.