
Assembly Instruction
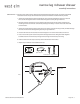

OVER BALANCE To prevent injury and property damage from unexpected tipping of furniture, we highly recommend
installation of the two (2) sets of overbalance protection hardware included with this product.
1. Attach the two mounting brackets horizontally to the top back edge of the furniture. Insert the
2. Determine where the furniture is to be placed and mark location on the wall for the other two
mounting bracket screw holes. It should be placed approximately 2” below the bracket mounted
to the furniture.
3. Attach the two mounting brackets vertically to the wall by inserting the long screws provided through
the holes in the bracket and tightening securely using screwdriver.
short screws through the holes in the bracket and tighten securely using screwdriver.
4. Place the furniture so the brackets on the back edge are in line with the brackets on the wall.
5. Lace an end of the nylon restraint strap down through each bracket. Bring both ends together
and slide the thin end of the strap through the receiving end of the strap until snug.
6. Check to make sure the strap is securely laced and locked to the brackets.
7. Repeat steps 5 and 6 for the second bracket set.
back side
wall
assembly instructions
Page 3 of 3
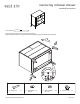
narrow leg 4 drawer dresser
9952037/9952011/9952045/9952029
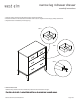
Mounting Plate 2x
Nylon Strap 1x
Small Screw 2x Large Screw 2x
Anti tip kit