morgan lateral file cabinet assembly instructions ! Tools required: ! Do not throw away packaging materials until assembly is complete. ! Assemble this item on a soft surface, such as cardboard or carpet, to protect finish.
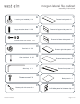
morgan lateral file cabinet assembly instructions Leveler (pre-installed) X 4 Large wooden dowel X 28 A B C Cam lock bolt X 30 D E 7978174—06/06 Drawer left upper side panel x 1 3 4 5 Drawer bottom panel x 2 Allen key X 1 Drawer pull with screw X 4 2 Drawer right side panel x 2 F Drawer screw X 4 Drawer back panel x 2 Drawer left lower side panel x 1 Bolt with Flat & Lock washer x 12 Cam lock X 30 1 6 Drawer front panel x 2 G 7 Back panel x 1 H 8 Left side panel w/ drawer clip x 1
morgan lateral file cabinet assembly instructions 9 I Back board screw X 21 Right side panel x 1 J Aluminum file hanging rod X 8 mounting bracket X 4 10 Bottom panel x 1 11 K Front rail x 1 L Back rail x1 Long screw X 2 Short screw X 2 12 M 13 Top panel x1 N Middle rail x 1 Nylon strap X 2 O Metal wall anchor X 2 Leg x 2 sets 14 15 16 Drawer bottom stiffener X2 7978174—06/06 Page of 10
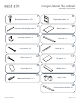
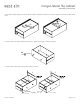
morgan lateral file cabinet assembly instructions 1. Screw cam lock bolts (E) into drawer side panels (2,3,4). 2. Insert cam locks (D) into holes in drawer back panel (1). Be sure the arrow on the cam lock points toward the cam bolt as shown. 3. Insert cam lock bolts into cam locks and tighten with a phillips screwdriver. E 4 1 D 2,3 NOTE: The arrow of the cam lock should be pointing to the cam bolt when placed in hole as shown.
morgan lateral file cabinet assembly instructions 4. Screw cam lock bolts (E) into drawer front panels (6). 5. Slide drawer bottom panel (5) into drawer sides as shown. 4 E 5 2,3 6 6. Insert cam locks (D) into holes in drawer side panels. Be sure the arrow on the cam lock points toward the cam bolts. Insert cam lock bolts into cam locks and tighten with a phillips screwdriver.
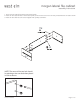
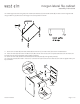
morgan lateral file cabinet assembly instructions 7. Slide drawer bottom stiffeners (16) into drawer bottoms and fasten with drawer screws (G). Tighten screws with a phillips screwdriver. G 16 8. Fasten drawer pulls (H) to drawer fronts as shown. Tighten screws with a phillips screwdriver. H 9. Insert aluminum file hanger rods (J) into notches in drawers.
morgan lateral file cabinet assembly instructions 10. Fasten legs to the base using bolts, lock washers, flat washers (C) and wooden dowels (B) in order as shown. Tighten bolts using the allen key (F). Be sure to orient legs in the correct position as shown. F C 11. Screw cam lock bolts (E) and insert dowels (B) into front rail (11) and back rail (12) as shown in details below. 12. Insert cam locks (D) into holes in middle rail (14). Be sure the arrow on the cam lock points toward the cam bolt.
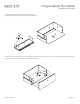
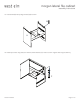
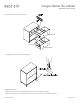
morgan lateral file cabinet assembly instructions 15. Insert dowels (B) into top edge of sides (8,9) as shown. B 9 8 16. Fasten top to sides using bolts, lock washers, and flat washers (C) in order as shown. Tighten bolts using the allen key.
morgan lateral file cabinet assembly instructions 17. Insert dowels (B) into bottom edge of sides. 18. Fasten base to sides using bolts, lock washers, and flat washers (C) in order as shown. Tighten bolts using the allen key (F). B C F 19. Fasten back panel (7) into back of cabinet using back board screws (I). Tighten screws with a phillips screwdriver.
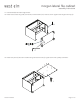
morgan lateral file cabinet assembly instructions 20. Insert drawers into cabinet as shown. Upper Drawer Drawer Clip Lower Drawer 21. Adjust levelers as shown to prevent tipping. CARE INSTRUCTION Hardware may loosen over time. Periodically check that all connections are tight. Wipe with a soft, dry cloth. To protect finish, avoid the use of chemicals and household cleaners.
morgan lateral file cabinet assembly instructions OVER BALANCE. To prevent injury and property damage from unexpected tipping of furniture, we highly recommend installation of the two (2) sets of overbalance protection hardware included with this product . 1. Attach the two mounting brackets securely to the back edge of the furniture. Place one on each of the side panels. 2. Determine where the furniture is to be placed and mark location on the wall for the other tw o mounting bracket screw holes.