! , 0 1 , " 4 5 2 3 " # # ' " ' " # # * * # ( - " ( # $ ' ( ' * + + & ( * ' ( # ' # - # ' # ( # .
N P H O Q M O R M O C O T S M O M O U C C G H G C F I J G K L G M L M M O ? @ A B C D E F
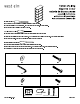
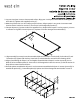
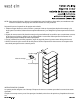
1. Lay two of part (4) parallel to each other on a clean smooth surface such as carpet or cardboard. Align shelves (1) onto the part (4) like the drawing shows. Insert bolt (B), and flat washer (A). Tighten with sup plied hex key. Repeat for all four shelves. 1. Poser 2 de partie (4) parallèles une è l’autre sur une surface propre, douce comme un tapis ou un carton. Aligner les étagères (1) sur la partie (4) comme montré dans le dessin. Insérer les verrous (4), les rondelles plates (A).
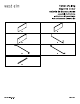
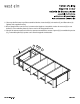
2. Align shelf (2) to the assembled shelves from step 1. Insert bolt (D), lock washer (E), flat washer (A). Tighten with supplied hex key. 2. Aligner l’étagère (2) aux étagères assemblés dans l’étape 1. Insérer les boulons (D), les rondelles (E), les rondelles plates (A). Serrer avec la clé hexagonale fournie. 2. Enfile el estante (2) con los estantes ensamblados en el paso 1. Inserte los pernos (D), la arandela de pre sion (E), la arandela plana (A). Apriete con la llave hexagonal suministrada.
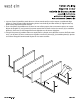
3. Lay part 6 and part 5 onto a clean smooth surface. Align part 7 with parts 5 and 6 like the drawing shows. Insert bolt (F). Tighten with supplied hex key (C). 3. Mettre les parties 6 et 5 sur une surface propre et douce. Aligner partie 7 avec partie 5 comme montré dans les dessin. Insérer les verrous (F). Serrer avec la clé hexagonale fournie (C). 3. Coloque la parte 5 y la parte 6 sobre una superficie lisa y limpia. Enfile la parte 7 con las partes 5 y 6 como se muestra en el grafico.
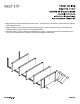
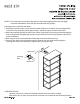
5. Place top shelf #3 onto top of the assembled shelves. Insert bolt (D), lock washer (E), and flat washer (A). Tighten with supplied hex key. 5. Placer l’étagère haut numéro 3 sur le sommet des étagères si assemblés. Insérer les verrous (D), les ron delles (E) et les rondelles plates (A). Serrer avec la clé hexagonale fournie. 5. Coloque el estante superior #3 sobre los estantes ensamblados. Inserte el perno (D), la arandela de presion (E), y la arandela plana (A).
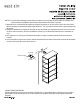
NOTICE: To prevent injury and property damage from unexpected tipping of furniture, we highly recommend installation of the anti-tip kit included with this product. Attaching tower to wall with anti-tip kits. 1. Determine where the tower is to be placed and mark location on the wall for the mounting bracket screw holes. They should be placed approximatly 1” below the top on the back of the tower. 2.
NOTEZ : Pour éviter des damages et des blessures causés par un accidentel chavirement du meuble, nous recommandons l’installation d’un kit anti-chavirement inclus dans ce produit. 1. Déterminer où cet article doit être placé et marquer la position sur le mur pour les trous des vis de la bre telle de montage. Ils doivent être placés approximent 1’’ (cm 2,5) sous le sommet dans la partie postérieure de l’article. 2.
NOTA: Para prevenir lesiones y daños a la propiedad por que el mueble se haya caido, recomendamos alta mente la instalacion del equipo anti volcada incluido con este producto. Sujetando la torre a la pared con el equipo anti volcada. 1. Ubique el lugar donde va a colocar la torre y marque el sitio en la pared para la placa de montaje y los hoyos para los tornillos. Deben ubicarse aproximadamente 1”por debajo de la parte superior trasera de la torre. 2.