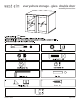
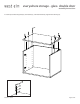
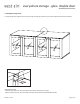
everywhere storage - glass double door assembly instructions Screw 8x K Tie plate 1x 8405235 - 07/06 Page of 10
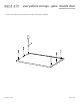
everywhere storage - glass double door assembly instructions 1. Screw cams into holes in top panel as shown. Tighten with phillips screwdriver.
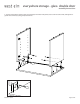
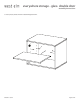
everywhere storage - glass double door assembly instructions 2. Connect top to sides as shown. Insert cam tunnels (B) into holes in side panels, insert cams into cam tunnels, and tighten together with cam locks (C) using phillips screwdriver.
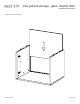
everywhere storage - glass double door assembly instructions 3. Slide in back panel as shown.
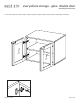
everywhere storage - glass double door assembly instructions 4. Fasten top to sides using bolts (D), lock washers (F), and metal washers (E). Tighten with allen key (G).
everywhere storage - glass double door assembly instructions 5. Insert pins (H) and set in shelf at desired height as shown.
everywhere storage - glass double door assembly instructions 5. Insert door hinges into sides as shown. Tighten hinges and adjust hinge for door alignment using phillips screwdriver.
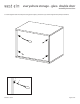
everywhere storage - glass double door assembly instructions 6. Fasten together back and side panel using plastic clasps (I) and screws (J) as shown. Tighten with phillips screwdriver.
everywhere storage - glass double door assembly instructions For Multiple Storage Units: 7. Fasten storage units together in back using connection plate (K) and screws (J) as shown. Tighten with phillips screwdriver. K J CARE INSTRUCTIONS Hardware may loosen over time. Periodically check that all connections are tight. Wipe with a soft, dry cloth. To protect finish, avoid the use of chemicals and household cleaners.
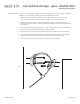
everywhere storage - glass double door assembly instructions OVER BALANCE. To prevent injury and property damage from unexpected tipping of furniture, we highly recommend installation of the overbalance protection hardware included with this product. 1. Attach the mounting brackets horizontally to the top back edge of the furniture. Insert the short screws through the holes in the bracket and tighten securely using screwdriver. 2.