
Specifications


8
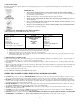
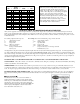
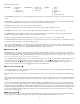
MEASUREMENT EQUIVALENT CHART
CUP
=
FLUID
OUNCE
=
TBSP.
=
TSP.
1 = 8 = 16 = 48
7/8 = 7 = 14 = 42
3/4 = 6 = 12 = 36
2/3 = 5-1/3 = 10-2/3 = 32
5/8 = 5 = 10 = 30
½ = 4 = 8 = 24
3/8 = 3 = 6 = 18
1/3 = 2-2/3 = 5-1/3 = 16
¼ = 2 = 4 = 12
¼ = 1 = 2 = 6
1/8 = 1 = 1 = 3
½ = 1 = 3
¼ = 1-2 = 1-1/2
ADAPTING YOUR FAVORITE BREAD/DOUGH RECIPES
After you have prepared some of the recipes in this book, you may wish to adapt some of your favorite conventional bread recipes to the bread
maker. Some experimentation will be required on your part and you will need to check the condition of the dough during the knead cycle for any
minor adjustment that may be needed in liquid or flour. Either use one of the recipes in this book that is similar to your recipe as a guide, or use the
formula that follows:
For each cup of flour used in recipe use: For example, based on the formula using 3 cups of flour, start with:
3 ounces liquid, 75-85°F 9 ounces liquid, 75-85°F
½ tablespoon fat 1-1/2 tablespoons fat
½ teaspoon salt 3 cups bread flour
½ tablespoon sweetener 1-1/2 teaspoons salt
scant ¾ teaspoon active or 1-1/2 tablespoons sweetener
½ teaspoon bread machine/ 2 teaspoons active dry or 1-1/2 teaspoons bread
fast rise yeast machine/fast rise yeast
Add ingredients to the pan in recommended sequence: liquids first, followed by fat, then all dry ingredients except yeast. Level dry ingredients in
pan, make a slight well and add the yeast to well. Program for basic white-large 1-1/2 lb. setting. After 10 minutes of continuous kneading, check
the condition of dough. It should be soft, a bit sticky with a slight smear of dough under the knead bar. If too wet and sticky, add one (1) tablespoon
of flour at a time until dough gathers into a ball and does not cling to sides of pan. If too dry and motor is laboring, add one (1) teaspoon liquid at a
time until the dough becomes more pliable.
DO NOT EXCEED 3 CUPS OF BREAD FLOUR FOR A 1-1/2 POUND LOAF; 2 CUPS OF FLOUR FOR A 1 POUND LOAF.
SLICING BREAD – Always allow bread to cool at least 15 to 30 minutes before slicing. If you attempt to slice the bread immediately after baking,
it will be very difficult to slice and will be sticky.
STORING BREAD – Since homemade bread contains no preservatives, it does not stay as fresh for as long as commercially made bread. Store
your bread in a plastic bag or sealed storage container to keep it from dry out. Keep the bread at room temperature or in the refrigerator for up to one
week. For longer storage, put the bread in freezer. Slice before freezing so you can remove only the number of slices you need at a time.
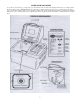
BECOME FAMILIAR WITH CONTROL PANEL – The control panel on your bread maker was designed to very easy to use. See Diagram 6.
Please review the following features to better understand what each button on control panel is designed to do and the options that are available to
you.
SELECT BUTTON
The select button lets you choose between a number of
different bread settings as well as a dough and jam setting.
With each press of the select button the number in the display
will advance to the next setting on the control panel menu.
When the machine is plugged into electrical outlet, SEL will
flash in display, indicating that a selection must be made
before the machine can be turned on.
HIGH ALTITUDE ADJUSTMENT
Reduced air pressure at high altitudes causes yeast gases
to expand more rapidly and the dough to rise more
quickly. The dough can rise so much that when it begins
to bake, it will collapse due to overstretching of the gluten
structure. To slow the rising of the dough at high
altitudes, reduce the amount of yeast by ¼ teaspoon at a
time until you find the right amount. You can also reduce
the amount of liquid by a teaspoon or two. Some
experimentation will be needed when using your bread
maker at high altitudes. Make notes on the amount of
yeast and liquids used for future reference.