Model No. WLEVEX12920 Serial No. USER'S MANUAL Serial Number Decal QUESTIONS? As a manufacturer, we are committed to providing complete customer satisfaction. If you have questions, or if there are missing parts, please call: 08457 089 009 Or write: ICON Health & Fitness, Ltd. Customer Service Department Unit 4 Revie Road Industrial Estate Revie Road Beeston Leeds, LS118JG UK email: csuk@iconeurope.com CAUTION Read all precautions and instructions in this manual before using this equipment.
TABLE OF CONTENTS IMPORTANT PRECAUTIONS . . . . . . . . . . . . . . . . . . . . . . . . . . . . . . . . . . . . . . . . . . . . . . . . . . . . . . . . . . . . .2 BEFORE YOU BEGIN . . . . . . . . . . . . . . . . . . . . . . . . . . . . . . . . . . . . . . . . . . . . . . . . . . . . . . . . . . . . . . . . . . .3 ASSEMBLY . . . . . . . . . . . . . . . . . . . . . . . . . . . . . . . . . . . . . . . . . . . . . . . . . . . . . . . . . . . . . . . . . . . . . . . . . . .4 HOW TO OPERATE THE EXERCISE CYCLE . .
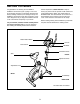
BEFORE YOU BEGIN Congratulations for selecting the new WESLO® PURSUIT 102 exercise cycle. Cycling is one of the most effective exercises for increasing cardiovascular fitness, building endurance, and toning the body. The PURSUIT 102 exercise cycle offers a selection of features designed to let you enjoy this healthful exercise in the convenience and privacy of your home. Service Department at 08457 089 009. To help us assist you, please note the product model number and serial number before calling.
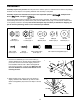
ASSEMBLY Assembly requires two persons. Place all parts of the exercise cycle in a cleared area and remove the packing materials. Do not dispose of the packing materials until assembly is completed. Assembly requires the included tools and your own adjustable spanner driver , and pliers . , Phillips screw- Use the part drawings below to identify the small parts used in assembly. The number in parenthesis below each drawing refers to the key number of the part, from the PART LIST on page 14.
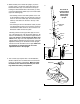
3. Whilst another person holds the Upright (13) in the position shown, connect the Upper Wire (36) to the Reed Switch Wire (43). Cut and remove the zip tie holding the Reed Switch Wire to the Frame (1). Next, connect the Resistance Cable (19) to the Lower Cable (45) in the following way: 3 Be careful to avoid pinching the wires and cables whilst inserting the Upright. • See drawing A. Press the small cylinder on the end of the Resistance Cable (19) into the hole in the connector on the Lower Cable (45).
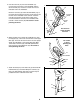
5. Hold the Console (16) near the Handlebar (15). Connect the ground wire to the Handlebar with the Ground Screw (27). Insert the console wire into the indicated hole in the Handlebar. 5 16 Move the Console (16) toward the Handlebar (15), at the same time inserting the excess ground wire up into the hole in the underside of the Console. Continue until all of the excess ground wire is inside of the Console. Attach the Console to the Handlebar with four M5 x 12mm Screws (49).
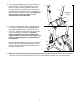
8. Turn the indicated Adjustment Knob (9) counterclockwise and remove it. Insert the Seat Post (5) into the Frame (1). Align one of the adjustment holes in the Seat Post with the indicated hole in the Frame. Insert the Adjustment Knob into the Frame and the Seat Post, and turn the Knob clockwise until it is tight. Make sure that the Knob is inserted through one of the adjustment holes in the Seat Post. 8 5 Adjustment Holes 1 Hole 9 9. Identify the Left Pedal (24), which is marked with an “L.
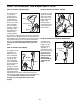
HOW TO OPERATE THE EXERCISE CYCLE HOW TO ADJUST THE SEAT POST HOW TO ADJUST THE PEDAL STRAPS For effective exercise, the seat should be at the proper height. As Seat you pedal, there should be a slight bend in your knees Seat Post when the pedals are in the lowest Hole position. To adjust the height of the Knob seat, first turn the indicated knob counterclockwise and remove it. Next, slide the seat post up or down and align one of the adjustment holes in the seat post with the indicated hole in the Frame.
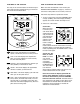
FEATURES OF THE CONSOLE HOW TO OPERATE THE CONSOLE The easy-to-use console features six modes that provide instant exercise feedback during your workouts. The modes are described below. Make sure there are batteries in the console (see BATTERY REPLACEMENT on page 11). If there is a thin sheet of clear plastic on the console, remove it. Follow the steps below to operate the console. 1. To turn on the power, press the ON/RESET button or begin pedalling.
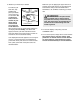
3. Measure your heart rate, if desired. Make sure you are applying the proper amount of pressure to the pulse sensor. Try the pulse sensor several times until you become familiar with it. Remember to sit still whilst measuring your heart rate. To measure your heart rate, stop pedaling and place your thumb on the pulse sensor as shown. Do not press too hard, or the circulation in your thumb will be Pulse Sensor restricted and your pulse will not be detected.
MAINTENANCE AND TROUBLESHOOTING Inspect and tighten all parts of the exercise cycle regularly. Replace any worn parts immediately. To clean the exercise cycle, use a damp cloth and a small amount of mild detergent. Important: To avoid damage to the console, keep liquids away from the console and keep the console out of direct sunlight. 43 21 38 BATTERY REPLACEMENT 46 If the console display becomes dim, the batteries should be replaced; most console problems are the result of low batteries.
CONDITIONING GUIDELINES The following guidelines will help you to plan your exercise program. Remember that proper nutrition and adequate rest are essential for successful results. During the first few minutes of exercise, your body uses easily accessible carbohydrate calories for energy. Only after the first few minutes of exercise does your body begin to use stored fat calories for energy.
SUGGESTED STRETCHES The correct form for several basic stretches is shown at the right. Move slowly as you stretch—never bounce. 1 1. Toe Touch Stretch Stand with your knees bent slightly and slowly bend forward from your hips. Allow your back and shoulders to relax as you reach down toward your toes as far as possible. Hold for 15 counts, then relax. Repeat 3 times. Stretches: Hamstrings, back of knees and back. 2 2. Hamstring Stretch Sit with one leg extended.
PART LIST—Model No. WLEVEX12920 Key No. Qty. 1 2 3 4 5 6 7 8 9 10 11 12 13 14 15 16 17 18 19 20 21 22 23 24 25 26 27 28 29 1 1 1 4 1 1 2 2 2 4 2 1 1 2 1 1 1 1 1 1 1 1 2 1 2 1 1 6 2 Description Key No. Qty.
EXPLODED DRAWING—Model No.
ORDERING REPLACEMENT PARTS To order replacement parts, contact the ICON Health & Fitness, Ltd. office, or write: ICON Health & Fitness, Ltd.