
Use and Care Guide


(Continued) Section 7
FRAMING THE ROUGH OPENING
9
Installing Headers
If no joists have been cut, go to “Single Headers”
below.
If any joists have been cut, go to “Double Headers”
on page 10.
Single Headers
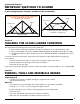
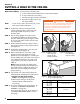
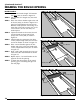
STEP 1. Measure the header length “H” between
the joists as shown in Figure 12.
STEP 2. Cut 2 headers this length. Use
joist-sized lumber.
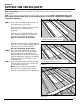
STEP 3. Place one of these headers at one end of
your chosen location (Figure 13). The
header must fit snugly between the joists.
Hammer it into position if necessary; if it is
more than 1/16 inch too long, trim it. If it is
more than 1/16 inch too short, cut
another piece.
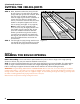
STEP 4. Square the header to one joist and drive
3 nails (16d) through the joist and into the
header. Check for squareness and drive
3 nails (16d) through the other joist and
into the header (Figure 13).
STEP 5. Position the second header 54 inches from
the first one and repeat Step 4 (Figure 14).
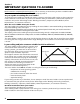
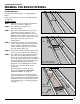
STEP 6. The frame for the rough opening requires
four sides. The headers make up two of
those sides. If your ceiling joists are spaced
so that they make up the other two sides of
the rough opening, check the opening for
squareness by measuring across the
diagonals. The measurements should be
within 1/8" to be considered square
(Figure 14).
When the frame is square, go on to
Section 8.“INSTALLING TEMPORARY
SUPPORT BOARDS” on page 12.
If your ceiling joists do not make up the
other two sides of the rough opening, you
need to install one or two additional pieces
of lumber to frame the other side(s) of the
rough opening, go to “Installing Stringers”
on page 11.
Figure 12
H
Figure 13
Drive 3 Nails (16d) into
each end of the Header
Nails
Header
Joists
Figure 14
Diagonal
Measurements
Header
Header
Nails
54"