
Use and Care Guide

Section 6
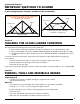
CUTTING THE CEILING JOISTS
7
STEP 1. If the room has a ceiling and you have cut
the required hole, go to step 2.
If the room has no ceiling, you will need to
mark the joists according to (A) or
(B) below.
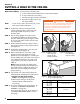
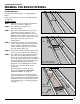
(A) If the chosen location is parallel to the
joists, mark the rough opening length on
top of the joists as shown in Figure 8.
Do not cut the joist at this mark.
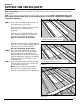
(B) If the chosen location is perpendicular to
the joists, mark the rough opening width on
top of the joists as shown in Figure 9.
Do not cut the joist at this mark.
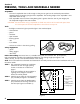
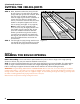
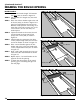
STEP 2. Cut 2 joist-sized boards long enough to
span 2 joists on each side of your chosen
location (Figure 10). These boards will
support the joists that will be cut and help
keep the ceiling from sagging or completely
collapsing while you are working in the
overhead space.
STEP 3. Place these boards approximately 24 inches
from the edge of your chosen location and
nail as shown in Figure 10.
Note: The 24 inch distance is needed to
give you room to hammer nails into the
frame that you will build in the next section.
Before Proceeding: You must have either: a) exposed joists, or b) a correctly sized hole at the desired
ceiling location.
Goal: To cut out any joists that are in the way of your chosen location. Before cutting the joists, you
must attach them to other joists in the overhead access to keep the ceiling from sagging or
completely collapsing.
Figure 8
Dotted Line Indicates Your Chosen
Location (Location Parallel to Joist).
Figure 9
Dotted Line Indicates Your Chosen Location
(Location Perpendicular to Joist).
Figure 10
Joist Support
Boards
Nail or Screw
Boards to Each Joist