
Use and Care Guide

(Continued) Section 1
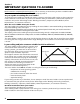
IMPORTANT QUESTIONS TO ANSWER
3
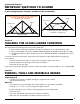
Is your ceiling and joist structure suitable for this installation?
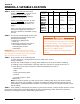
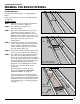
WARNING: DO NOT CUT THESE TYPES OF STRUCTURES
WITHOUT CONSULTING AN ARCHITECT
OR STRUCTURAL ENGINEER.
Ceiling Joist
Rafter
Truss Roof Frame
Figure 2. Truss roof frame and conventional roof frame with braces connected to ceiling joists.
Section 2
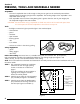
CHECKING THE ACCESS LADDER CONDITION
You should have the following items in the access ladder box:
– 1 Access Ladder completely assembled and ready for installation. Do not disassemble to install.
– 1 Pull Cord and Handle if your have: W2200, W2500, W2200-48 or W2500-48 Series Access Ladder.
– 1 Push/Pull Down Rod and Hook Assembly if you have: WH2200, WH2500, or WH3000 Series Access
Ladder.
To save time and prevent accidents, inspect the access ladder for shipping damage before beginning
the installation.
– Check the wooden frame side rails, steps and door panel for splits in the wood.
– Check all metal parts for damage such as bends and cracks.
– Check that all rivets are tight.
If any items are missing or damaged, contact the place of purchase or Werner Ladder Co. at 1-724-588-8600.
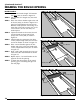
Ceiling Joist
Rafter
Conventional Roof Frame with Braces
Connected to Ceiling Joists
Braces
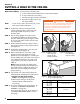
People Required
– 2 people (one of whom is capable of lifting the 70 pound access ladder
into the overhead space)
Materials
– several pieces of joist-sized lumber (the amount depends on the specific installation)
– 2 boards, 1" x 4" x 36", to serve as temporary support boards
– boards to lay across joists to make a working platform in the overhead space
– wood shim stock
– 16d sinker nails (24-60 depending on the specific installation)
– 20d sinker nails are needed for installations where joists are cut
Section 3
PERSONS, TOOLS AND MATERIALS NEEDED