
Use and Care Guide

(Continued) Section 10
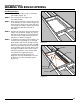
SHIMMING, SQUARING AND NAILING THE
ACCESS LADDER IN PLACE
14
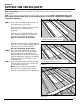
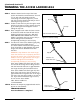
STEP 2. Pre drill all nail locations shown with arrows in
Figure 22 using a 1/8" drill bit. Do not drill into
the joists or headers. Nail the access ladder to the
frame following these instructions.
a. Drive ten 16d nails, checking squareness
and re-shimming as necessary, as shown in
Figure 22. Nails at locations marked “B” must
go through the hole in each of the metal
brackets. Push the ladder up from below until
the hole in the bracket is uncovered, then
drive the nail through the hole. Locations
marked “C” indicate that a nail should be
driven through each wooden “stop block”.
b. Be careful not to hit the springs with the
hammer.
STEP 3. Trim the portion of the shims that stick out above
and below the frame. Shims sticking
out above the frame are a tripping hazard
and must be removed.
A
B
C
Stop
Block
Nail
Location
Diagonal
Measurements
Hinge End
Figure 22
➨
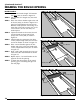
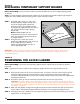
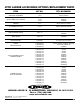
Figure 23
Measure
Distance
D and E
Draw Trim
Line
Mark Distance
D and E
D
E
Note: D will be
shorter than E
D
E
Section 11
TRIMMING THE ACCESS LADDER LEGS
Before Proceeding: You should have the access ladder shimmed and nailed at the proper locations.
Goal: To trim the access ladder legs so that they fit flush with the floor and there are no gaps between the
hinged sections of the access ladder when it is fully extended. It is extremely important that you do not trim
the legs too short!
WARNING:
The access ladder is not yet safe to use. Do not stand on the access ladder or leave it unattended
until it is permanently nailed to the frame AND the legs are properly trimmed. Using the access ladder before
the legs are properly trimmed will damage the access ladder and may cause it to break unexpectedly resulting
in serious injury.
STEP 1. Pull the access ladder door down until it
locks open.
STEP 2. Fold the bottom section of the access ladder
under the middle section. (Figure 23)
STEP 3. With a straight edge, measure distances “D”
and “E” as shown in Figure 23 and record the
measurements in the spaces below. These
distances must be accurately measured to
avoid trimming the legs too short.
NOTE: Measure “D” and “E” from both
side rails of the access ladder—the
ceiling-to-floor height may not be the
same for both sides of the ladder!
Left Rail Right Rail
“D” ___________ ___________
“E” ___________ ___________