
Use and Care Guide

Section 8
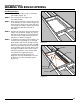
INSTALLING TEMPORARY SUPPORT BOARDS
12
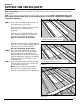
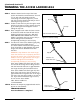
STEP 1. Using four nails, attach a 1" x 4" x 36"
board (temporary support board) at the
end of the rough opening where the
hinged end of the access ladder will be.
This temporary support board must form a
3/8" ledge across the rough opening
(Figure 20).
Note: Double-headed nails are
recommended as they are easily removed
when the temporary support boards are
no longer needed.
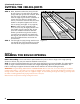
STEP 2. Using four nails, attach the second
temporary support board to the other end
of the rough opening so that the
temporary support boards are 52-1/2
inches apart (Figure 20).
WARNING: Make sure that the temporary support boards are 52-1/2 inches apart on both sides of
the opening. The access ladder is likely to fall from the ceiling if the temporary support boards are
not properly spaced.
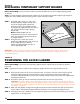
Before Proceeding: You must have a frame of joist-sized lumber the size of the rough opening shown
on the box.
Goal: To install temporary support boards at both ends of the frame that provide ledges large enough to
support the access ladder while still leaving room to open the access ladder.
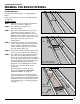
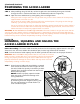
STEP 1. Insert the pull cord into the hole in the door panel. Tie a knot in the end of the cord to keep the
cord from slipping through the hole when the door is pulled open.If your access ladder box
contained a push/pull down rod and hook assembly instead of a pull cord, follow the supplemental
installation instructions.
STEP 2. One person must go into the overhead space while the other person stays below.
CAUTION: The access ladder cannot be used to climb into or out of the overhead space until it is
permanently nailed to the frame you built AND the access ladder legs have been properly trimmed.
This means that (in some installations) the person in the overhead space must remain there until the
installation is complete.
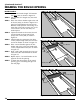
STEP 3. Make sure that people are kept far enough away from the work area that they will not be hit if the
access ladder is accidentally dropped while being lifted onto the temporary support boards.
STEP 4. Carefully lift the access ladder onto the temporary support boards from below making sure that the
hinged end is in the right place.
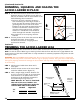
First
Temporary
Support
Board
Second
Temporary
Support
Board
Location of
Nails or
Screws
3/8" Ledge at Hinged End
52-1/2"
52-1/2"
Figure 20. View From Below
Section 9
POSITIONING THE ACCESS LADDER
Before Proceeding: You must have temporary support boards at both ends of the frame as shown in
Figure 20.
Goal: To position the access ladder on the temporary support boards in the right direction for use.