
Use and Care Guide

(Continued) Section 7
FRAMING THE ROUGH OPENING
11
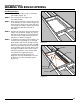
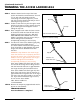
Installing Stringers
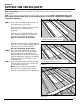
STEP 1. Measure the stringer length “S” between
the headers (Figure 18).
STEP 2. Cut a stringer to this length. Use
joist-sized lumber.
STEP 3. If the ceiling joist does not provide one side
of the frame, then cut a second stringer the
same length as the first one. Note that only
one stringer is needed in Figure 18 because
the ceiling joist provides one side of
the frame.
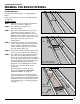
STEP 4. Position the stringer(s) along the unframed
side(s) of your location (Figure 19). Check
that the inside dimensions of the frame are
the same as the rough opening shown on
the box or in Table 2 on page 6.
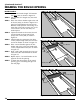
STEP 5. To attach the stringer(s) to the headers, use
nails that are long enough to go through
both headers and into the stringer at least
one inch. In most cases, a 4 inch nail (20d)
will be long enough. Square the stringer(s)
to the headers at one end and drive 3 nails
through the headers and into the stringer.
Check for squareness, then nail the other
end. Check the rough opening for
squareness by measuring across the
diagonals. The two measurements should
be within 1/8" to be considered square
(Figure 19).
Figure 19
Figure 18
S
Headers
Stringer
Diagonal
Measurements
Headers
Nails