
Installation Guide


STEP 3:
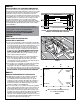
LOCATING THE STAIRWAY:
A. Measure and verify ceiling height (the distance
from the nished oor to the nished ceiling)
prior to beginning installation.
B. Allow sufficient area for a safe landing space
at the bottom of the stairway. Be sure there
is enough clearance for the swing of the stair as
it is being unfolded to its full length (see FIGURE 1
for “landing space” and “swing clearance”;
match the ceiling heights shown on the packing
carton with the same ceiling height in TABLE A to
determine proper landing space and swing
clearance requirements).
STEP 1:
BEFORE INSTALLATION:
Verify that this product and its installation meet all
applicable building codes. Check stair carefully
for shipping damage. Please mark the model
name and size of the stair you purchased on the
Installation Instructions for future reference. Keep
this instruction brochure with the installed stair. You
should have experience with squaring, leveling,
sawing, and aligning structural supports before
attempting to install this unit. If you do not have the
skills to install a window frame or door unit, please
hire a professional to install this stairway. Improper
installation could result in stairway collapse and
possible bodily injury.
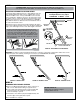
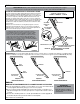
NOTE: KEEP THE CORNERS SQUARE TO SIMPLIFY INSTALLATIONFIGURE 2 FIGURE 3
TABLE A
STRINGER
BRACE
STRINGER
BRACE
HEADER
BRACE
HEADER
BRACE
STRINGER
BRACE
STRINGER
BRACE
HEADER
BRACE
HEADER
BRACE
STEP 2:
INSPECTION OF MERCHANDISE:
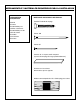
DO NOT DISASSEMBLE STAIRWAY! MAKE SURE ALL
NUTS, BOLTS AND SCREWS ARE SECURELY FASTENED.
Remove cord and pull-handle from stairway, place
through hole in plywood door and knot the end.
STEP 4:
MAKING THE OPENING:
A. Cut the rough opening through the ceiling material as
shown in TABLE A.
B. Frame the rough opening to the size shown in TABLE A.
C. If it is necessary to cut ceiling joists. BE SURE to tie the
cut members to other joists with a header or stringer
brace of the same dimensions
(see FIGURES 2 and 3).
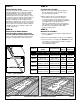
FIGURE 1 - WOOD STAIRWAYS
Model #*
Rough
Opening
Ceiling Height Range
Landing
Space (1)
Swing
Clearance (2)
W Series/WU2210 Model (Load Rating: 250lbs./113 kg)
W2208
22 ½" x 54"
(0.57 m x 1.37 m)
84" - 105"
(2.30 m x 2.67 m)
54"
(1.37 m)
64"
(1.63 m)
W2210
22 ½" x 54"
(0.57 m x 1.37 m)
105" - 124"
(2.67 m x 3.15 m)
63"
(1.60 m)
74"
(1.88 m)
W2508
25" x 54"
(0.64 m x 1.37 m)
84" - 105"
(2.30 m x 2.67 m)
54"
(1.37 m)
64"
(1.63 m)
W2510
25" x 54"
(0.64 m x 1.37 m)
105" - 124"
(2.67 m x 3.15 m)
63"
(1.60 m)
74"
(1.88 m)
WU2210
22 ½" x 54"
(0.57 m x 1.37 m)
95" - 124"
(2.41 m x 3.15 m)
63"
(1.60 m)
74"
(1.88 m)
*Products sold in Canada will have model numbers ending in "CA".