
Installation Guide
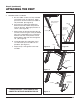


Before Proceeding: You must have a location that:
A) Is free of hazards and obstructions in the overhead space.
B) Is free of hazards in the ceiling.
C) Provides enough room for installation.
D) Provides enough room to use
the attic ladder.
Goal: To cut a correct sized hole in the
ceiling at the desired location.
Figure 4 Figure 5
Section 1.4
CUTTING A HOLE IN THE CEILING
15
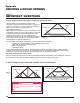
WARNING
Do not saw, cut, or hammer into the ceiling
until you are sure that the location is free
of hazards and obstructions in the ceiling
and attic. Contact with an electric wire
can be deadly.
Figure 6
Step 1. Prepare the room by moving furniture,
covering flooring with a drop cloth and
removing children and pets to a safe
distance away.
Step 2. Put on safety goggles and a dust mask.
These will keep pieces of ceiling particles
and dust from falling into your eyes, mouth
or nose as you make a starter hole and cut
into the ceiling.
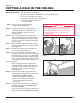
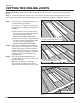
Step 3. With a hammer and chisel, make a starter
hole near the center
of the chosen location
(See F
igure 4).
Step 4. Enlarge the opening with a saw until you
can see a joist (See Figure 5).
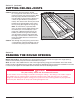
Step 5. Draw a rectangle the size of the rough
opening on the ceiling, the size of the rough
opening must be 22-1/2" x 54" (AH2210) or
25" x 54" (AH2510), with one edge parallel
to a joist (See Figure 6). You may do this by
sawing until you reach a joist and use it as a
frame of refe
rence.
Not
e: Locating at least one edge of the
opening along a ceiling joist will allow the
joist to be used as a side of the frame you
will build. This will simplify framing the
rough opening.
Step 6. Cut out the rest of the ceiling within the
marked outline following these instructions:
A) Do not cut any joists at this
time. Cut through the ceiling only.
B) Remove the ceiling in small pieces
because ceiling mater
ial can be
very heavy.
Step 7. If no joists span the hole in the ceiling, go
to Section 1.6, page 17 “FRAMING THE
ROUGH OPENING”.
If any joists span the hole, go to Section 1.5,
page 16 “CUTTING THE CEILING JOISTS”.