
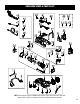
Replacement Part List


OPERATION
BEFORE BEGINNING OPERATION
Bleed the device as follows prior to operation:
1. Connect the spray gun to the pressure washer. Connect
the garden hose to the pressure washer and turn ON the
water supply.
2. Ensure that no nozzles are installed in the end of the lance.
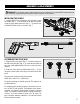
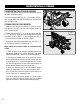
3. Unlock the power trigger (Fig. 7 - 1) on the spray gun.
4. Pull the trigger. Allow the water to run for approximately
2 minutes until there are no bubbles present in the water
stream, indicating that air has been bled from the system.
5. Release and lock the power trigger.
OPERATING THE PRESSURE WASHER
Before operating the pressure washer, make sure it is in the
horizontal position. Lock the casters in place using the tab
on the outside of the casters.
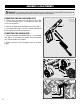
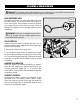
1. Make sure that the power switch (Fig. 8 - 1) is switched to
the OFF position before plugging the pressure washer into
the power source.
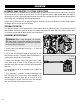
2. Plug the GFCI into a matching receptacle (see p. 8 for im-
portant electrical information). We recommend that you test
the GFCI as part of the startup procedure each time you use
the pressure washer. Press the RESET button (Fig. 9), and
the power indication light should turn ON. Press the TEST
button, and the power indication light should turn OFF. DO
NOT use if the test fails. Press the RESET button again after
completing the test to enable operation.
3. Make sure that the high pressure hose and the garden
hose are securely connected to the pressure washer. See the
“CONNECTING THE HIGH PRESSURE HOSE” and the “CON-
NECTING THE GARDEN HOSE” sections on page 12. Turn on
the water supply.
Fig. 7
WARNING! To prevent serious injury, make sure all the warnings and instructions have been read and
understood before operating this tool.
CAUTION! Do not connect the pressure washer to a potable water system without a backflow prevention
method installed, if required by your local jurisdiction.
CAUTION! The water supply must not exceed 101 PSI.
CAUTION! The washer must only be used with clean water. Using unfiltered water containing corrosive
chemicals will damage the pressure washer.
Fig. 8
1
1
4. Unlock the power trigger (Fig. 7 - 1) on the spray
gun. Hold the spray gun with two hands and be sure
to point it in a safe direction away from animals, by-
standers, and yourself. Press the power trigger until
a consistent stream of water flows through the lance,
to allow air trapped in the hose to escape. Install the
nozzle of your choice.
5. Turn the power switch (Fig. 8 - 1) ON.
6. Hold the spray gun with both hands and aim it at
the object that you would like to clean.
7. To stop the water, release the power trigger.
13
Fig. 9
Reset
Test