
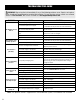
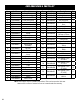
Replacement Part List


WARNING! To avoid injury from accidental startups, be sure that the tool is switched OFF and disconnected
from the power supply before performing assembly, inspection or adjustments.
ASSEMBLY & ADJUSTMENTS
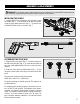
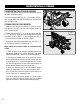
INSTALLING THE HANDLE
1. Using a Phillips-head screwdriver (not included), secure
the handle (Fig. 1 - 1) to the body of the pressure washer
using the two handle connectors (Fig. 1 - 2) and the four
included ST4.8x16 screws as shown in Fig. 1.
Fig. 1
Fig. 2
Fig. 3
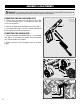
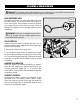
ASSEMBLING THE SPRAY GUN
1. Align the tabs in the lance (Fig. 2 - 1) with the notches in
the end of the spray gun (Fig. 2 - 2). Insert the lance into the
gun, then rotate approximately 1/4 turn to secure the lance
in place.
2. Snap one of the three included nozzles (Fig. 3 - 1) onto
the quick-connect collar of the spray lance until it clicks into
place.
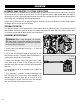
Your pressure washer includes three nozzles:
White (40º), Yellow (15º), and Red (0º).
For general cleaning use the 40º spray tip. This option is for
cement walkways.
For stripping, spot cleaning, blasting, and hard to reach ar-
eas, use the 15º or 0º spray tip. These options are for remov-
ing paint, rust, mildew, marine growth on boats, or grease
stains. These options can be used for reaching second story
surfaces, or for the removal of paint, rust, oil stains, tar,
gum, and other stubborn substances. Use extreme caution
when using these nozzles.
1
2
1
2
1
11