MODEL HB6319, HB632V 3" x 18" HANDHELD BELT SANDER Instruction Manual NEED HELP? CONTACT US! Have product questions? Need technical support? Please feel free to contact us: 1-800-232-1195 (M-F 8AM-5PM CST) TECHSUPPORT@WENPRODUCTS.COM IMPORTANT: Your new tool has been engineered and manufactured to WEN’s highest standards for dependability, ease of operation, and operator safety. When properly cared for, this product will supply you years of rugged, trouble-free performance.
CONTENTS WELCOME 3 Introduction ..................................................................................................... 3 Specifications................................................................................................... 3 SAFETY 4 General Safety Rules ........................................................................................ 4 Belt Sander Safety Warnings............................................................................ 6 Electrical Information ....
INTRODUCTION Thanks for purchasing the WEN Belt Sander. We know you are excited to put your tool to work, but first, please take a moment to read through the manual. Safe operation of this tool requires that you read and understand this operator’s manual and all the labels affixed to the tool. This manual provides information regarding potential safety concerns, as well as helpful assembly and operating instructions for your tool. Indicates danger, warning, or caution.
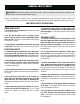
GENERAL SAFETY RULES WARNING! Read all safety warnings and all instructions. Failure to follow the warnings and instructions may result in electric shock, fire and/or serious injury. Safety is a combination of common sense, staying alert and knowing how your item works. The term “power tool” in the warnings refers to your mains-operated (corded) power tool or battery-operated (cordless) power tool. SAVE THESE SAFETY INSTRUCTIONS. WORK AREA SAFETY 1. Keep work area clean and well lit.
GENERAL SAFETY RULES WARNING! Read all safety warnings and all instructions. Failure to follow the warnings and instructions may result in electric shock, fire and/or serious injury. Safety is a combination of common sense, staying alert and knowing how your item works. The term “power tool” in the warnings refers to your mains-operated (corded) power tool or battery-operated (cordless) power tool. SAVE THESE SAFETY INSTRUCTIONS. 7.
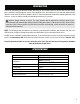
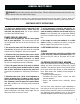
BELT SANDER SAFETY WARNINGS WARNING! Do not operate the power tool until you have read and understood the following instructions and the warning labels. WARNING! EXTREME CAUTION REQUIRED WHEN SANDING PAINT. The dust residue may contain LEAD, which is poisonous. Exposure to even low levels of lead can cause irreversible brain and nervous system damage, to which young and unborn children are particularly vulnerable.
BELT SANDER SAFETY WARNINGS WARNING! Do not operate the power tool until you have read and understood the following instructions and the warning labels. 11. Unplug Your Sander. Ensure that the sander is disconnected from the main supply before servicing, lubricating, making adjustments, changing accessories, or replacing sanding belts. Accidental start-ups may occur if the tool is plugged in during an accessory change. Before plugging the tool back in, check that the trigger is OFF. 2.
ELECTRICAL INFORMATION DOUBLE-INSULATED CHARGER The tool’s electrical system is double-insulated where two systems of insulation are provided. This eliminates the need for the usual three-wire grounded power cord. Double-insulated tools do not need to be grounded, nor should a means for grounding be added to the product. All exposed metal parts are isolated from the internal metal components with protecting insulation.
UNPACKING & PACKING LIST UNPACKING Carefully remove the belt sander from the packaging and place it on a sturdy, flat surface. Make sure to take out all contents and accessories. Do not discard the packaging until everything is removed. Check the packing list below to make sure you have all of the parts and accessories. If any part is missing or broken, please contact customer service at 1-800-232-1195 (M-F 8-5 CST), or email techsupport@wenproducts.com.
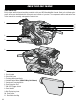
KNOW YOUR BELT SANDER TOOL PURPOSE Easily shape and finish wood and other materials with your WEN Handheld Belt Sander. Refer to the following diagrams to become familiarized with all the parts and controls of your tool. The components will be referred to later in the manual for assembly and operation instructions. 1 4 5 6 7 2 3 8 9 1. Front Handle 2. Drive Belt Cover 3. Tracking Adjustment Knob 4. Variable Speed Wheel (HB632V Only, Not Shown) 5. Continuous Running Switch 6. Dust Extraction Port 7.
ASSEMBLY & ADJUSTMENTS CHOOSING SANDING BELTS Sanding belts come in different grades from rough to smooth. Select the grade required for the particular job. Refer to the table below for the type and applications of different grades. Also refer to the table to select the suitable operating speed setting for your intended use (for model HB632V only). Model HB6319 is a single-speed model; you cannot change its speed. Your sander comes with one 80-grit sanding belt.
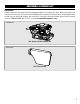
ASSEMBLY & ADJUSTMENTS DUST COLLECTION The dust produced by sanding can be hazardous to your health. Always wear a dust mask and operate the tool in a well-ventilated area. This sander comes with a dust collection bag. Before operating the sander, make sure to install the dust bag, or connect the tool to a suitable dust extraction system. The dust port’s outer diameter is 1-7/16”; its inner diameter is 1-1/4”.
OPERATION CAUTION! Never cover the air vents. They must always be open for proper motor cooling. Make sure that the work piece is free of nails and other foreign objects that could tear the abrasive belt. OPERATING THE BELT SANDER 1. Hold machine firmly with both hands and assume a balanced position. Fig. 4 3 2. Pull the trigger switch (Fig. 4 - 1) and allow the motor to reach full speed. For continuous operation, press in the power lock-on button located on the side of the handle (Fig. 4 - 2). 3.
MAINTENANCE NOTE: Follow instructions on page 10 under “Installing or Replacing the Sanding Belt” to regularly change the sanding belt, for optimal safety and quality of sanding. NOTE: Follow instructions on page 11 under “Dust Extraction with Dust Bag” to regularly empty the contents of the dust bag. Use a dry cloth to clean and make sure ventilation openings are always clear. REPLACING THE DRIVE BELT 1. Locate the drive belt cover on the side of the machine. Fig. 5 1 2.
19 9 20 69 68 106 105 70 52 50 65 66 62 63 54 67 71 53 51 49 4 12 59 60 17 58 102 44 55 103 3 1 56 64 EXPLODED VIEW & PARTS LIST 27 2 13 26 57 16 43 5 25 8 7 NOTE: Not all parts may be available for purchase. Parts and accessories that wear down over the course of normal use are not covered under the warranty.
EXPLODED VIEW & PARTS LIST MODEL HB6319 No. 1 2 Part No. 3 4 5 7 8 9 101 13 14 15 16 17 18 19 20 21 102 6318-102 24 103 27 104 36 37 38 6318-022 6318-104 39 6318-027 Description Qty.
19 9 20 69 52 50 56 57 16 68 106 105 70 65 66 62 63 54 59 60 17 58 102 44 55 103 67 71 53 51 49 5 1 64 EXPLODED VIEW & PARTS LIST 27 2 13 26 3 4 12 25 8 6 7 NOTE: Not all parts may be available for purchase. Parts and accessories that wear down over the course of normal use are not covered under the warranty.
EXPLODED VIEW & PARTS LIST MODEL HB632V No. 1 2 Part No. 3 4 5 6 7 HB632V-006 8 9 101 13 14 15 16 17 18 19 20 21 102 6318-102 24 103 27 104 36 37 38 6318-022 6318-104 39 6318-027 Description Qty.
WARRANTY STATEMENT WEN Products is committed to building tools that are dependable for years. Our warranties are consistent with this commitment and our dedication to quality. LIMITED WARRANTY OF WEN PRODUCTS FOR HOME USE GREAT LAKES TECHNOLOGIES, LLC (“Seller”) warrants to the original purchaser only, that all WEN consumer power tools will be free from defects in material or workmanship during personal use for a period of two (2) years used for professional or commercial use.
THANKS FOR REMEMBERING V. 2021.07.