
Use and Care Manual


11
OPERATION
CHANGING/REPLACING SANDING DRUMS AND SLEEVES
1. As always, disconnect the sander from the power source.
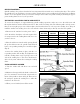
2. Remove the spindle sanding components in reverse order of the installation (Fig. G).
3. Clean all sawdust and debris from the opening for the table insert, the throat plates and any other areas where it
may have collected.
4. Select which new sanding diameter you would like to use and install all necessary components (Fig. G).
5. Secure the sanding drum with the appropriate spindle washer and nut. Tighten until the rubber sanding drum
places enough pressure on the sanding sleeve to prevent it from freely spinning without the drum.
NOTE: The 1/2 inch sanding sleeve does not use a sanding drum. Instead, it mounts directly onto the spindle shaft.
INSTALLING THE BELT SANDER
Belt sanding is helpful for sanding straight lines or
curves along the outside edge of a workpiece. The
belt-sanding attachment oscillates up and down while
the belt moves horizontally across the workpiece.
The work stop supports the workpiece during sand-
ing, helping to prevent it from being ejected by the
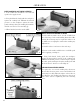
moving sanding belt (Fig. H). To use the belt sander,
remove the spindle sanding components and follow
these steps:
1. Unplug the sander from the power source.
Fig. H
Belt Sanding
Attachment
2. If spindle sanding components are installed, remove them and place them back in their respective storage slots.
3. Install the belt-sanding attachment to the spindles (Fig. H). Secure it in place with the spindle nut.
4. Install the work stop and secure it in place using the wing bolt. Test run the belt sander to make sure its operating
properly before applying any load.
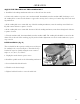
Workstop
BELT SANDING STRAIGHT LINES
1. Turn sander ON and allow it to reach full speed before
apply a load.
2. Support the workpiece against the workstop (Fig. I). Us-
ing both hands, guide the workpiece against the rotation
of the sanding belt. Do not force the workpiece against
the sanding belt. Allow the machine to do the work.
3. When finished, turn the sander OFF.
Fig. I