
Manual

Assembly and adjustments (continued)
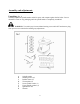
This spindle sander requires some assembly. For your safety, completely assemble the spindle
sander prior to plugging it in.
Dust collection (Fig. 2)
A 2-1/2" dust port is located at the back of the spindle sander. This port can be connected to a dust-
collection system (not provided).
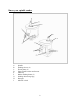
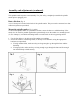
Mount the spindle sander (Fig. 3 and 4)
To mount the spindle sander in a permanent location, secure the base to a solid benchtop. If the
sander is to be used for portable applications, permanently secure the sander to a mounting board
(2). Use clamps (3) to hold the mounting board to a work bench or other supporting surface.
1. Use the four holes (1) in the base of the sander as a template.
2. Secure the sander to a mounting board, or directly to a workbench, using the appropriate
hardware (not provided).
• If using machine bolts, make sure they are long enough to go through the base and the
benchtop.
• If using lag bolts, make sure they are long enough to go through the base and far enough
into the benchtop to hold securely.
10