
Use and Care Manual


ADJUSTMENTS
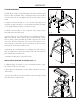
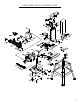
ADJUSTING THE SANDING BELT TRACKING
1. Turn on the power switch. If the belt looks like it is going
to slide off either drum, the belt tracking needs to be adjusted.
2. Turn the belt tracking adjustment nut (Fig. H -1) until the
belt rides on the center of the passive drum and drive drum.
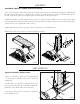
ADJUST THE BELT ASSEMBLY POSITION
CAUTION: Never make adjustments to the belt sander with-
out first unplugging the line cord from the electrical outlet.
Sanding belt assembly can be adjusted from the horizontal to
the vertical position. To adjust:
1. Loosen the socket head bolt (Fig. H - 4) that is threaded into
the pivot bracket.
2. Tilt the belt assembly to the desired position (from horizon-
tal to vertical). Secure the belt assembly position by tightening
the socket head bolt in the pivot bracket.
1
2
3
4
5
Fig. H
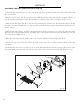
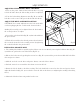
REPLACING ABRASIVE BELT
1. The sanding belt should be regularly replaced when worn or torn. Start by removing the belt dust chute (Fig. H -
5) with the two pan head screws and washers (Fig. H - 3).
2. Release the belt tension by pushing the tension lever (Fig. H - 2) towards the passive drum. Slide old belt off the
drive and passive drums.
3. Slide the new belt over the drive and passive drums; center the belt on drums.
4. Push the tension lever towards the drive drum to tension the belt.
5. Rotate the belt by hand to check the tracking. The belt should ride centered on the drive and passive drums.
Adjust the thumb nut (Fig. H - 1) as needed to center the belt on the drums (see Adjusting the sanding belt tracking
above).
6. Mount the belt dust chute using washer head screws.
12