
Use and Care Manual


11
ASSEMBLY
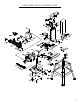
ASSEMBLE THE BELT TABLE AND DUST CHUTE
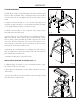
1. To move the table from the horizontal to the vertical position loosen the socket head bolt (Fig. E - 1) that threads
into the pivot bracket (Fig. F - 1). Tilt the belt assembly to the vertical position in order to install the table. Secure
the belt assembly in position by retightening the socket head bolt in the pivot brackets.
2. Slide the belt table assembly into the trunnion groove in the pivot bracket. Mount it in place using a socket head
bolt and a flat washer. Place the table in the desired position. Be sure that the gap between the belt and the table is
1/16 of an inch or less. Tighten the bolts securely.
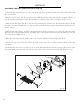
3. Mount the belt dust chute to the plate using two pan head screws and flat washers.
NOTE: The work stop can also be used instead of the belt table.
2
1
3
Fig. E Fig. F
1
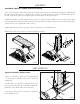
ADJUST THE BELT WORK TABLE
1. Place a combination square (not included) (Fig. G
- 1) on the belt work table so that it also touches the
sanding belt.
2. If the table is not 90 degrees with the disc, loosen
the socket head bolt (Fig. G - 3) and tilt the table. Re-
tighten the socket head bolt to secure the table.
3. Loosen the angle pointer screw (Fig. G - 2) and ad-
just it. Retighten screw.
Fig. G
1
2
3
ADJUSTMENTS