
Use and Care Manual


10
ASSEMBLY
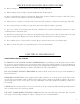
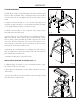
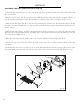
ASSEMBLE THE DISC TABLE AND DUST CHUTE
1. Attach the disc guard (Fig. D - 5) to the end shield using three socket pan head screws, three flat washers and
three lock washers.
2. Remove tape from key (Fig. D - 6) and armature. Slide the aluminum disc with abrasive sandpaper (Fig. D - 4)
onto the armature with keyway in disc aligned with key in armature. Secure disc to armature using set screw.
3. Slide the disc dust chute (Fig. D - 3) onto the disc guard (Fig. D - 5) from below the 9-inch disc (Fig. D - 4) with
the exhaust port aimed towards the rear of the tool. Secure the dust chute to the disc guard with two pan head screws
and flat washers.
4. Slide the disc table (Fig. D - 1) with the attached trunnion onto the raised bosses on each side of the disc guard.
Mount the two locking handles (Fig. D - 2) and flat washers through the trunnion into the threaded holes on each
side of the disc guard (Fig. D - 5).
5. Place the table in the desired position and secure it in place with the locking handles (Fig. D - 2).
6. Be sure the gap between the disc and the disc table is 1/16 inches or less without actually making contact with
one another.
7. If adjustment is necessary, loosen the set screws in the aluminum disc through the opening at the top-rear of the
disc guard. Position the disc 1/16 of an inch or less from the edge of the table. Secure the disc with a set screw.
1
2
3
4
5
Fig. D
6