
Use and Care Manual


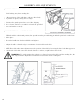

MOUNTING THE WORK SUPPORT
1. Align the Work Support with the hole.
2. Install a Lock Washer and a Flat Washer on the Hex
Screw.
3. Insert the Hex Screw into the Work Support hole. Tight-
en.
4. Adjust the Work Support height to avoid contact with the
sanding belt.
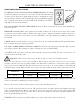
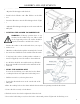
MOUNTING THE SANDER TO WORKBENCH
WARNING - If during operation there is any
tendency for the sander to tip over, slide or walk
on the supporting surface, the sander should be
properly mounted to a workbench or stand.
1. Position the sander on the workbench where you expect/
intend to use it.
2. Mark the workbench through the mounting holes located
in the sander base. Drill holes in the workbench at the marks.
3. Using long bolts, washers, locking washers and nuts as
shown (not supplied), secure the sander to the workbench.
Note: All bolts should be inserted from the top. Washers
and hex nuts should be fastened from the underside of the
workbench.
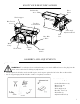
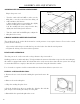
INSTALL THE SANDING BELT
1. Loosen the bed locking screw with the hex key. Raise
the sanding bed about 45°; tighten the bed locking screw.
2. Pull the tension lever, releasing the tension.
3. Locate the directional arrow on the smooth side of the
sanding belt.
9
ASSEMBLY AND ADJUSTMENTS
Wrench
4. Place the sanding belt over the drums with the directional arrow pointing towards the dust chute.
5. Center the belt correctly on both drums.
6. Push the tension lever back to tighten the belt to the bed.
7. Loosen the bed locking screw; lower the bed to a horizontal position. Tighten the bed locking screw.