
Use and Care Manual


15
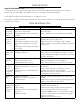
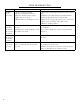
PROBLEM CAUSE SOLUTION
Sanding
grains easily
rub off belt
or discs
1) Sanding belt/disc has been stored in
an incorrect environment.
2) Sanding belt/disc has been damaged
or folded.
1) Store sanding accessories away from extremely hot/
dry temperatures.
2) Store sanding accessories flat—not bent or folded.
Deep sand-
ing grooves
or scars in
workpiece.
1) Sanding belt/disc grit is too coarse for
the desired finish.
2) Workpiece sanded across the grain.
3) Too much sanding force on work-
piece.
4) Workpiece held still against belt-disc
for too long.
1) Use a finer-grit sanding accessory.
2) Sand with the grain of the wood.
3) Reduce pressure on workpiece while sanding.
4) Keep workpiece moving while sanding on the sand-
ing accessory.
Sanding
surface clogs
quickly
1) Too much pressure against belt/disc
2) Sanding softwood.
1) Reduce pressure on workpiece while sanding.
2) Use different stock/sanding accessories, or accept
that this will happen and plan on cleaning or replacing
belts/discs frequently.
Burns on
workpiece
1) Use a sanding grit that is too fine.
2) Using too much pressure.
3) Work held still for too long.
1) Use a coarser-grit sanding accessory.
2) Reduce sanding pressure on workpiece
3) Do not keep workpiece in one place for too long.
Motor will
not start—
fuses or
circuit break-
ers tripping/
blowing
1) Short circuit in line, cord or plug.
2) Short circuit in motor or loose con-
nections
3) Incorrect fuses or circuit breakers in
power line.
1) Inspect cord or plug for damaged insulation and
shorted wires.
2) Inspect all connections on motor for loose or
shorted terminals and/or worn insulation.
3) Install correct fuses or circuit breakers or switch tool
to an appropriately sized circuit.
Motor over-
heats
1) Motor overloaded
2) Extension cord too long with an
insufficient gauge.
1) Reduce load on motor (pressure on object being
sanded)
2) Utilize an extension cord of appropriate gauge and
length or plug tool directly into outlet.
Motor stalls
(resulting in
blown fuses
or tripped
circuit)
1) Short circuit in motor or loose con-
nections.
2) Low voltage.
3) Incorrect fuses or circuit breakers in
power line.
4) Motor overload.
1) Inspect connections on motor for loose or shorted
terminals or worn insulations.
2) Correct low voltage conditions (for example: im-
proper extension cord length and/or gauge).
3) Install CORRECT fuses or circuit breakers or plug
tool into an appropriate circuit, matched to an appro-
priate fuse or breaker.
4) Reduce the load on the motor.
TROUBLESHOOTING
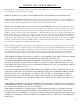
ADJUST THE DRIVE BELT (continued from previous page)
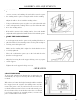
7. Test belt tension by squeezing both sides of the belt. If properly adjusted, the belt should “give” between
1/8–1/4 inch (3–6 mm). Make sure that the belt grooves are properly seated in the pulleys.
8. Carefully reinstall the drive belt housing cover. Tighten the screw.
Note: Excessive tightness on the pulley belt will cause increased noise and motor overload. Premature failure will
occur if belt is too loose.
MAINTENANCE