
Use and Care Manual


9
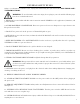
MOUNTING THE WORK STOP
1. Loosen and remove the hex bolt (Fig. F - 1) and the flat wash-
er (Fig. F - 2) from the plate.
2. Install the work stop and replace the hex bolt and washer to
hold it in place.
LEVELING TABLE ASSEMBLY
1. Place a combination square (not included, Fig. G - 1) on the
table so that it contacts both the table and the sanding disc.
2. If the table is not at a perfect 90 degrees with the disc, loosen
the angle lock knob (Fig. G - 3) and tilt the table retighten the
knob to hold the table in place.
3. Once the table is squared, loosen the angle pointer screw
(Fig. G - 2) and adjust the pointer so it is aiming directly at 0°.
Retighten the screw.
ADJUSTING THE BELT’S TRACKING
1. Turn on the switch. If the belt looks like it is going to slide off
either drum, the belt tracking needs to be adjusted.
2. Turn the belt tracking adjustment knob (Fig. H - 1) until the
belt rides in the center of both drums.
ADJUSTING THE SANDING BELT FOR VERTICAL
OPERATION
1. Using a spanner, loosen the two hex nuts (Fig. I - 1) until the
belt frame can be moved up and down.
2. Once the desired angle has been reached, retighten the hex
nuts to secure the plate in place.
ASSEMBLY AND ADJUSTMENTS
Fig. F
Fig. G
1
2
1
2
3
Fig. H
1
Fig. I
1