
Use and Care Manual


11
CHANGING THE SANDING DISC
1. Remove the work table from the sanding disc.
2. Remove the used sanding disc. A WEN 2020 Heat Gun can help to soften up the adhesive to make for an easier,
cleaner removal.
3. Wipe the sanding disc plate clean.
4. Peel the backing from the new sanding disc, align the disc with the plate and press the sanding disc firmly on to
the plate.
5. Reinstall the work table and tighten the screws.
MAINTENANCE
WARNING: For your own safety, turn the switch OFF and remove the plug from the electrical outlet before
adjusting or performing maintenance or lubrication work on the belt/disc sander.
Before using, check to make sure parts are not damaged, missing, or worn. Check for alignment of moving parts,
binding of moving parts, improper mounting, or any other conditions that may affect the sander operation. If any
of these conditions exist, do not use the sander until parts are replaced or the sander is properly repaired. Fre-
quently blow or vacuum dust from all sanding parts and motor housing.
WARNING: Any attempt to repair or replace electrical parts on this tool may be hazardous. Repairs should be
done by a qualified service technician.
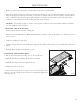
Fig. J
1
CHANGING THE SANDING BELT
1. Release the belt tension lever (Fig. J - 1) to loosen the belt.
2. Slide the old abrasive sanding belt off of the two drums.
3. Slide the new abrasive belt onto the two drums.
4. Tighten the belt tension lever.
5. Turn on the sander under no load to test the new belt. If the belt
tracks to one side, follow the procedure for belt tracking adjustment
found on page 9.