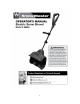
TABLE OF CONTENTS SPECIFICATIONS…………………………………………….. RULES FOR SAFE OPERATION…………………………….. IMPORTANT SAFETY INSTRUCTIONS…………………… UNPACKING………………………………………………….. ASSEMBLY…………………………………………………… OPERATION………………………………………………….. LUBRICATING THE SNOW SHOVEL……………………… EXPLODED VIEW…………………….……………………… PARTS LIST…………………………………………………… WARRANTY STATEMENT…………………………………. SPECIFICATIONS Model: Motor: Speed: Clearing width: Clearing height: Weight: 56660 120V, 60Hz, 9A 2100rpm (no load) 12.
RULES FOR SAFE OPERATION The purpose of safety symbols is to attract your attention to possible dangers. The safety symbols, and the explanations with them, deserve your careful attention and understanding. The safety warnings do not by themselves eliminate any danger. The instructions or warnings they give are not substitutes for proper accident prevention measures. Symbol Meaning Safety Alert Symbol: Indicated danger, warning, or caution, may be used in conjunction with other symbols or pictographs.
IMPORTANT SAFETY INSTRUCTIONS When using an electrical appliance, basic precautions should always be followed, including the following: READ ALL INSTRUCTIONS BEFORE USING YOUR SNOW SHOVEL WARNING- To reduce the risk of fire, electric shock, or injury, follow these safety instructions. Read, understand, and follow all instructions on the machine and in the manual(s) before operating this unit. Be thoroughly familiar with the controls and the proper use of the equipment.
Don’t abuse cord -Never carry snow shovel by cord or yank it to disconnect from receptacle. Keep cord from heat, oil, and sharp edges. Keep hands away from moving parts. Keep guards in place and in working order. Don’t force snow shovel -It will perform better and safer at the rate for which it was designed. Do not overreach -Keep proper footing and balance at all times. If the snow shovel strikes a foreign object, follow these steps: Stop the snow shovel. Inspect for damage.
UNPACKING WARNING - To prevent accidental starting that could cause possible serious personal injury; assemble all parts to your saw before connecting it to power supply. Snow shovel should never be connected to power supply when you are assembling parts, making adjustments, installing or removing blades, or when not in use. WARNING - If any parts are missing, do not operate this tool until the missing parts are replaced. Failure to do so could result in possible serious personal injury.
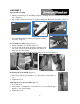
ASSEMBLY Upper handle assembly 1. Firmly insert the Pipe into the Handle (Figure 1); making sure tab is inserted into locking hole. (Figure 2) 2. Pipe is fully inserted and ready to be tightened using the Handle Knob fastener. (Figure 3) 3. Insert the Handle Knob fastener and tighten by turning clockwise. (Figure 4) Lower handle assembly (Figure 5, 6 & 7) 1. Put Pipe Bushing onto the Pipe (Figure 5). 2.
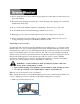
OPERATION Note: This Snow Shovel is intended for outdoor, residential use only. Do not use it indoors or for commercial or industrial purposes. Safety precautions 1. Thoroughly inspect the area where the equipment is to be used and remove all doormats, sleds, boards, wires, and other foreign objects. 2. Do not operate the equipment without wearing adequate winter garments. Avoid loose fitting clothing that can get caught in moving parts. Wear footwear that will improve footing on slippery surfaces. 3.
13. Never operate the snow shovel without proper guards and other safety protective devices in place and working. 14. Never direct the discharge toward people or areas where property damage can occur. Keep children and others away. 15. Do not overload the machine capacity by attempting to clear snow at too fast a rate. 16. Look behind and use care when backing up with the snow shovel. 17. Disengage power to the rotor blades when snow shovel is transported or not in use. 18.
2. Insert the loop through the hole in the back of the upper handle, securing the loop around the hook. Note: This helps to prevent you from accidently disconnecting the extension cord from the appliance during operation. 3. Connect the extension cord to the appliance electrical cord. 4. Plug the extension cord into a wall outlet. 5. Keep the area to be cleared free of stones, toys, or other foreign objects which the rotor blades may pick up and throw.
Operating Tips Start the Snow Shovel and tilt it forward until the scraper blade contacts the ground. Push the Snow Shovel forward at a comfortable rate of speed, slow enough to clear the path completely. The width and depth of the snow determines your forward speed. Direct the snow to the right or to the left by holding the Snow Shovel at a slight angle. For the most efficient snow removal, throw the snow downwind.
EXPLODED VIEW 13
PARTS LIST Item 1 2 3 4 5 6 7 8 9 10 11 12 13 14 15 16 17 18 19 20 21 22 23 24 25 26 27 28 29 30 31 32 Stock # 56660-001 56660-002 56660-003 56660-004 56660-005 56660-006 56660-007 56660-008 56660-009 56660-010 56660-011 56660-012 56660-013 56660-014 56660-015 56660-016 56660-017 56660-018 56660-019 56660-020 56660-021 56660-022 56660-023 56660-024 56660-025 56660-026 56660-027 56660-028 56660-029 56660-030 56660-031 56660-032 Description Screw Rubber Plug Screw Right Handle Switch Trigger Switch Trigger
WARRANTY STATEMENT Limited One Year Warranty WEN Products is committed to build tools that are dependable for years. Our warranties are consistent with this commitment and our dedication to quality LIMITED WARRANTY OF WEN CONSUMER POWER TOOLS PRODUCTS FOR HOME USE GREAT LAKES TECHNOLOGIES, LLC ("Seller") warrants to the original purchaser only, that all WEN consumer power tools will be free from defects in material or workmanship for a period of one (1) year from date of purchase.